Win10+Docker: Hybrid swarm on the Desktop
Win10+Docker: Hybrid swarm on the Desktop
Introduction
Windows 10 2004 brings possibilities … lots of possibilities.
Which means that if you’re like me, and like to mix things that originally shouldn’t be, then you will be in Nirvana.
This blog is very much pushing some boundaries, mixing with some small “hacks”, but I guarantee you it’s 100% fun.
So if you’re not afraid of testing “impossible” scenarios, jump along and, of course, DO NOT try this at Work. Stay at Home, you should know it by now (ok, bad confinement pun)
Sources
As I often stated: all ideas have an inspiration or are an alternative to something already done/existing.
For this blog post, my main inspirations were:
- Youtube: 3 videos by Kallie [MSFT]
- Blog: Hybrid docker swarm on Google Cloud by Captain Ajeet Singh Raina
- Gist: Hybrid (Windows+Linux) Docker Swarm by Runcy Oommen
Other references will be properly linked in the blog post.
So to everyone who already took the time to create content: THANK YOU!
Prerequisites
The following list might be quite long, so I won’t explain how to install it. However I will put the links that I used myself for this particular setup.
And, for the first time, please try this setup if you have 16Go RAM or more (32Go to be on the safe side). There’s quite a lot of virtualization overhead, so if you have only 8Go RAM, it might short.
Here is the shopping list:
-
OS: Windows 10 with the latest update (2004) or if you reading it now, the Insider Release Preview is the minimum
-
Win10 Features:
-
WSL2: a Store or Custom distro
-
[Optional] Windows Terminal
-
[Optional] Visual Studio Code
Ok, once you have installed all the pieces above, let’s setup them all and create “the Great Hybrid Swarm”.
Docker Desktop: 2 daemons running wild
For the first setup, well we will already be applying our first “hack”: running both the Windows and Linux daemon.
In the past, I blogged about it twice (here and there) and actually this very cool hack is still possible with the latest Docker Desktop version.
As there’s a lot of setup to be done, I will just show the way to do it, without going too much into details:
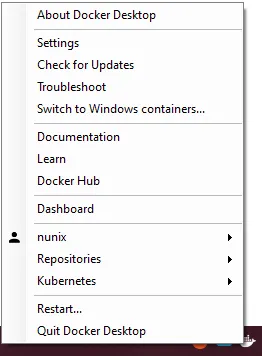
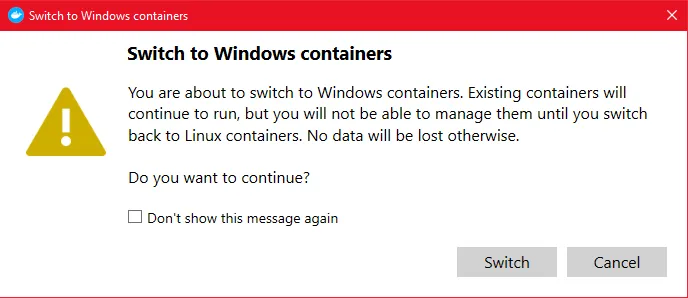
- Start Docker Desktop and switch to Windows Containers (if not the default)
-
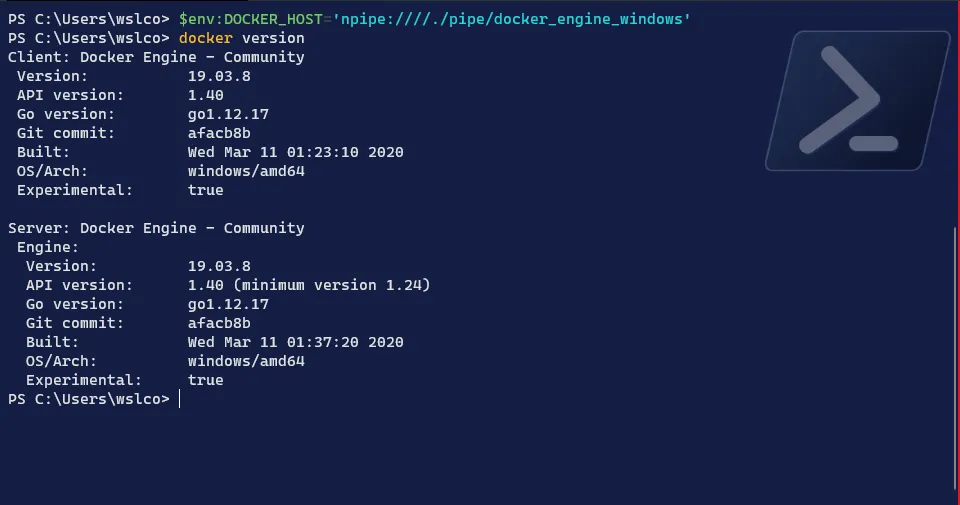
In powershell set the variable
$env:DOCKER_HOSTto the Docker Windows named pipeTerminal window # Sets the variable DOCKER_HOST for the Windows docker client$env:DOCKER_HOST='npipe:////./pipe/docker_engine_windows'
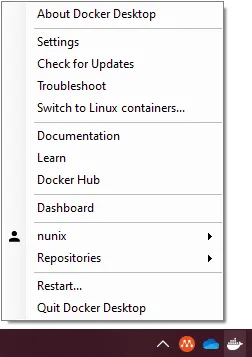
- Once done, switch back to Linux containers, it will be needed for the WSL2 node
And we’re done on the first node. Please note that this won’t remain upon restart of Docker Desktop or reboot of the computer.
So it’s quite safe to do it and won’t harm the “standard” setup of your computer.
WSL2: Linux on the (Docker) Desktop
For the WSL2 distro, let’s take the “stable” distro in it’s newest and shiny version:
Now, in order to have access to Docker Desktop, thanks to the new configuration and the WSL2 backend, I have to enable the integration in the settings:
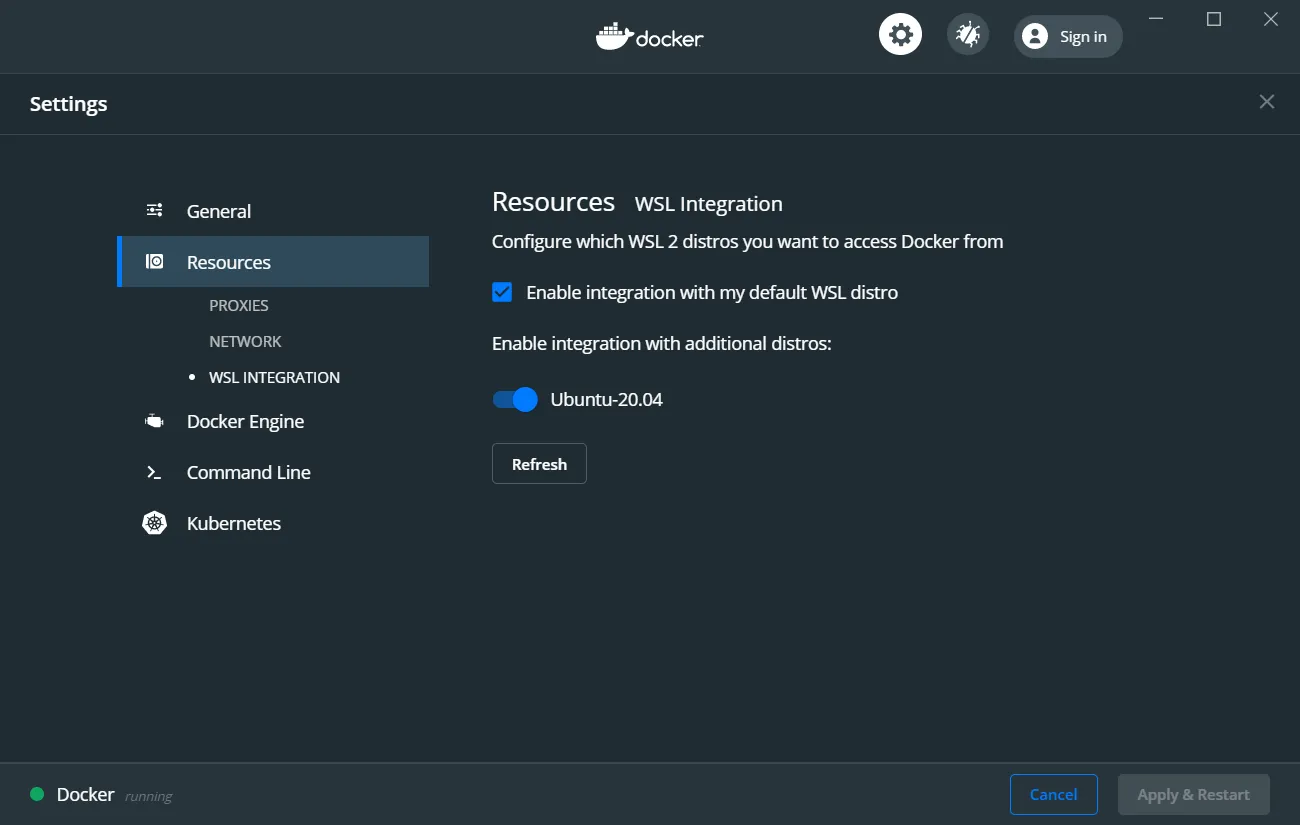
Once done, click on “Apply & Restart” and confirm docker is correctly mounted (bonus: Simon’s WSLConf video to explain it all):
# Verifies which OS is docker running ondocker info --format '{{ .OperatingSystem }}'# Verifies that the client can connect to the enginedocker version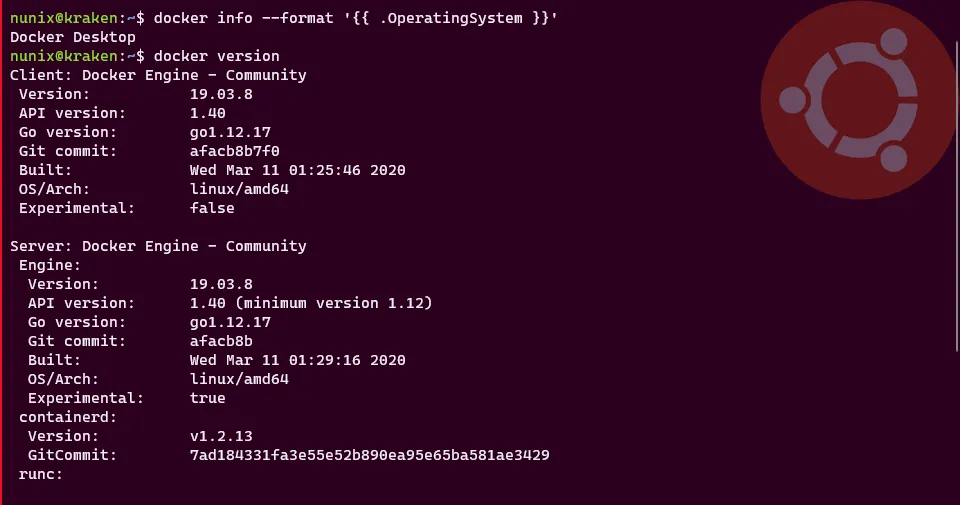
And we’ve done the second node and as you can see (hopefully), Docker Desktop is running “twice”. Cool right?
Let’s now move into our second Linux node.
Multipass: the Fossa is everywhere
Canonical has this multi-platform tool for creating an Ubuntu VM from the command line called Multipass.
The goal is, à la Docker, to have explicit while “simple” commands to create, manage and delete an Ubuntu instance. And thanks to the multi-platform availability (read: Linux, MacOS, Windows), it’s gaining a strong momentum.
Ok, still here? good, let’s create our new Multipass Ubuntu instance:
-
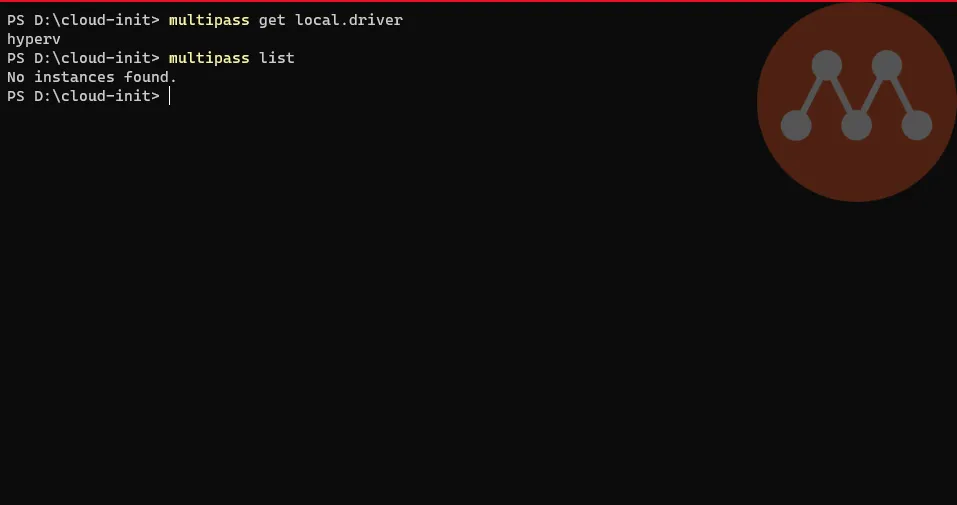
Check which virtualization backend is chosen
Terminal window # Check the driver used by Multipassmultipass get local.driver# List all created instancesmultipass list
-
Create and launch a new instance (the cloud-init idea came from Bret Fisher video on multipass)
Terminal window # Check content of a cloud-init configuration filecat docker.yaml# Creates the new instance with the cloud-init configuration file and with the focal imagemultipass launch --name <hostname> --cloud-init docker.yaml focal# Check that docker was installed and it's runningmultipass exec <hostname> docker version
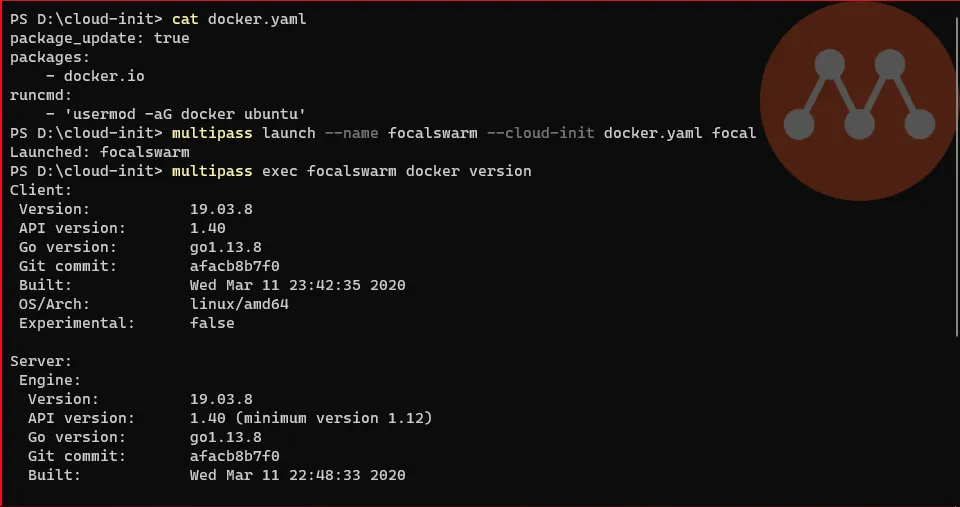
One more node configured and ready to join the swarm. As the script from Docker (used by Bret in his video) is still not ready for Ubuntu 20.04 (a.k.a Focal Fossa), we had to install the package from the repository.
Win2019: Hyper-Vagrant
To mix things a bit, let’s use another deployment tool: Vagrant.
While Multipass helped us have an Ubuntu instance, for Windows Server we have normally to install it on a Virtual Machine (Hyper-V or any other solution of your choice). Then run through some configuration (and reboots), to finally be able to use it.
The whole process can be done fast if we know what to do, but what if we could have the same workflow has Multipass: download a preconfigured image and run it.
Well, say hello to Vagrant. Again, I won’t explain much here as, for one I’m at very beginner level with Vagrant and (Captain) Stefan Scherer has an excellent blog about it.
He already created a Windows Server 2019 with Docker image and that’s what we will use:
-
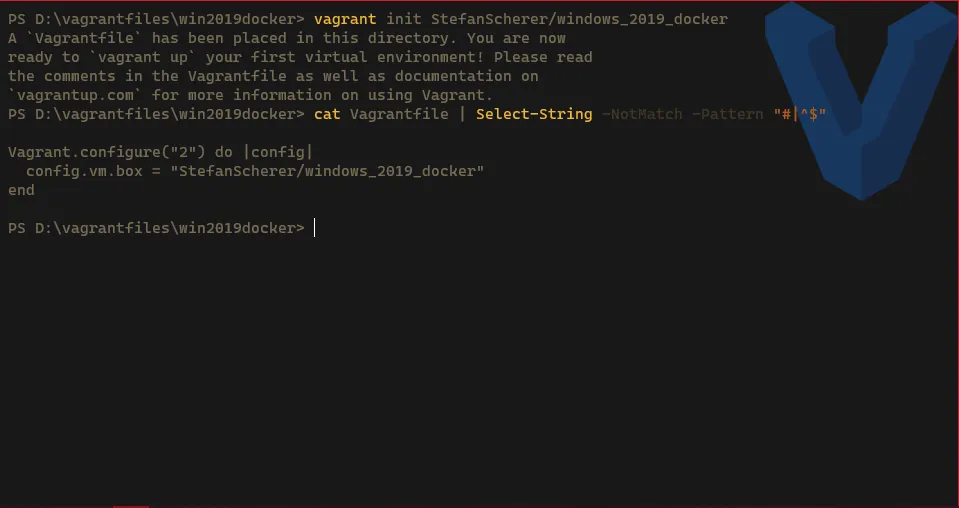
Create the Vagrantfile
Terminal window # Download the Vagrantfilevagrant init StefanScherer/windows_2019_docker# Check the Vagrantfile > remove the commented and empty linescat Vagrantfile | Select-String -NotMatch -Pattern "#|^$"
-
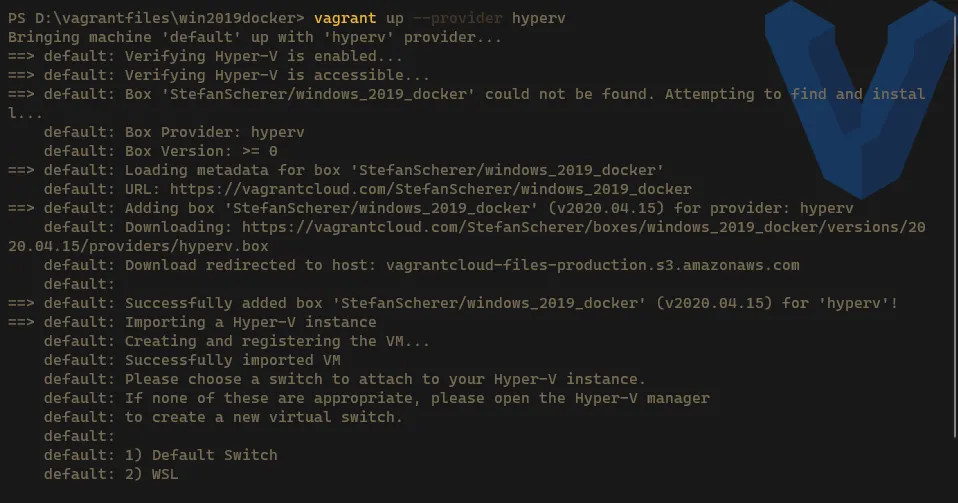
Create a new VM -> on the first run, the image (Box) needs to be downloaded, so it might take quite some time depending on your internet speed
Terminal window # Create the new VM on Hyper-Vvagrant up --provider hyperv
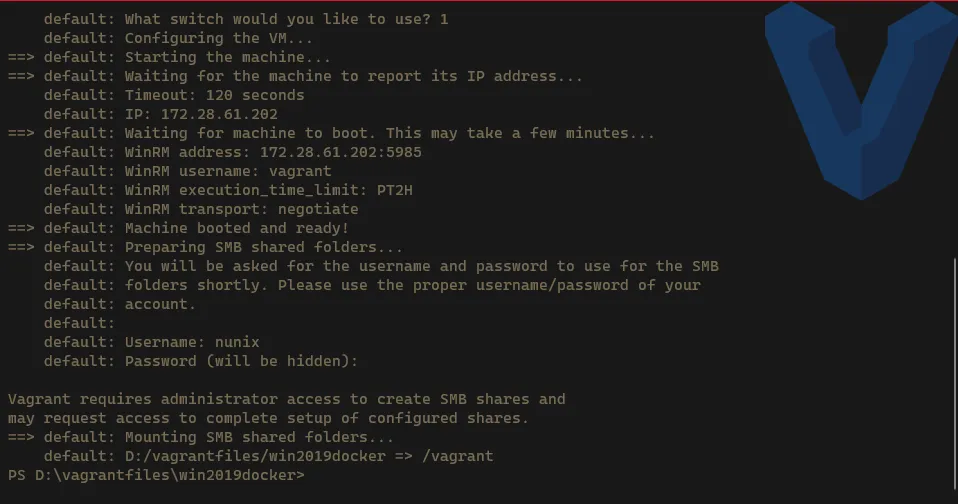
-
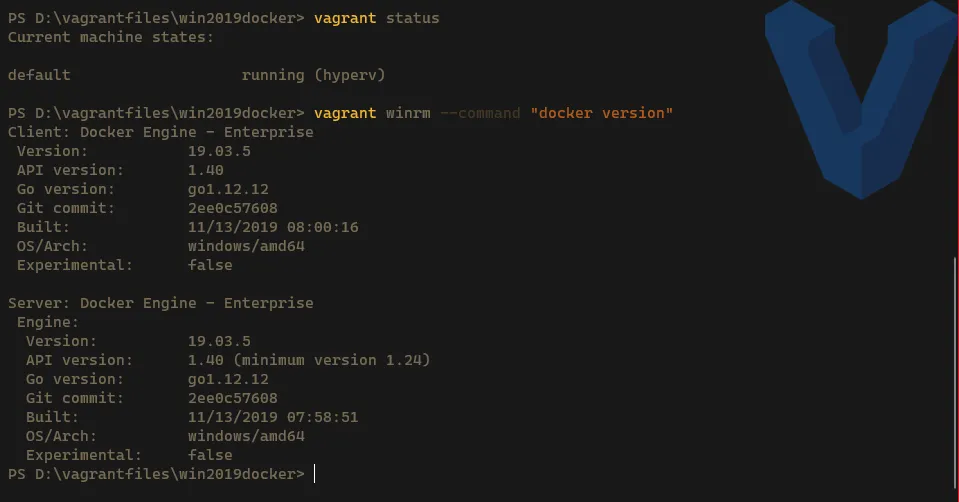
Check the status and if docker is correctly running
Terminal window # Check the status of the VMvagrant status# Check if Docker is runningvagrant winrm --command "docker version"
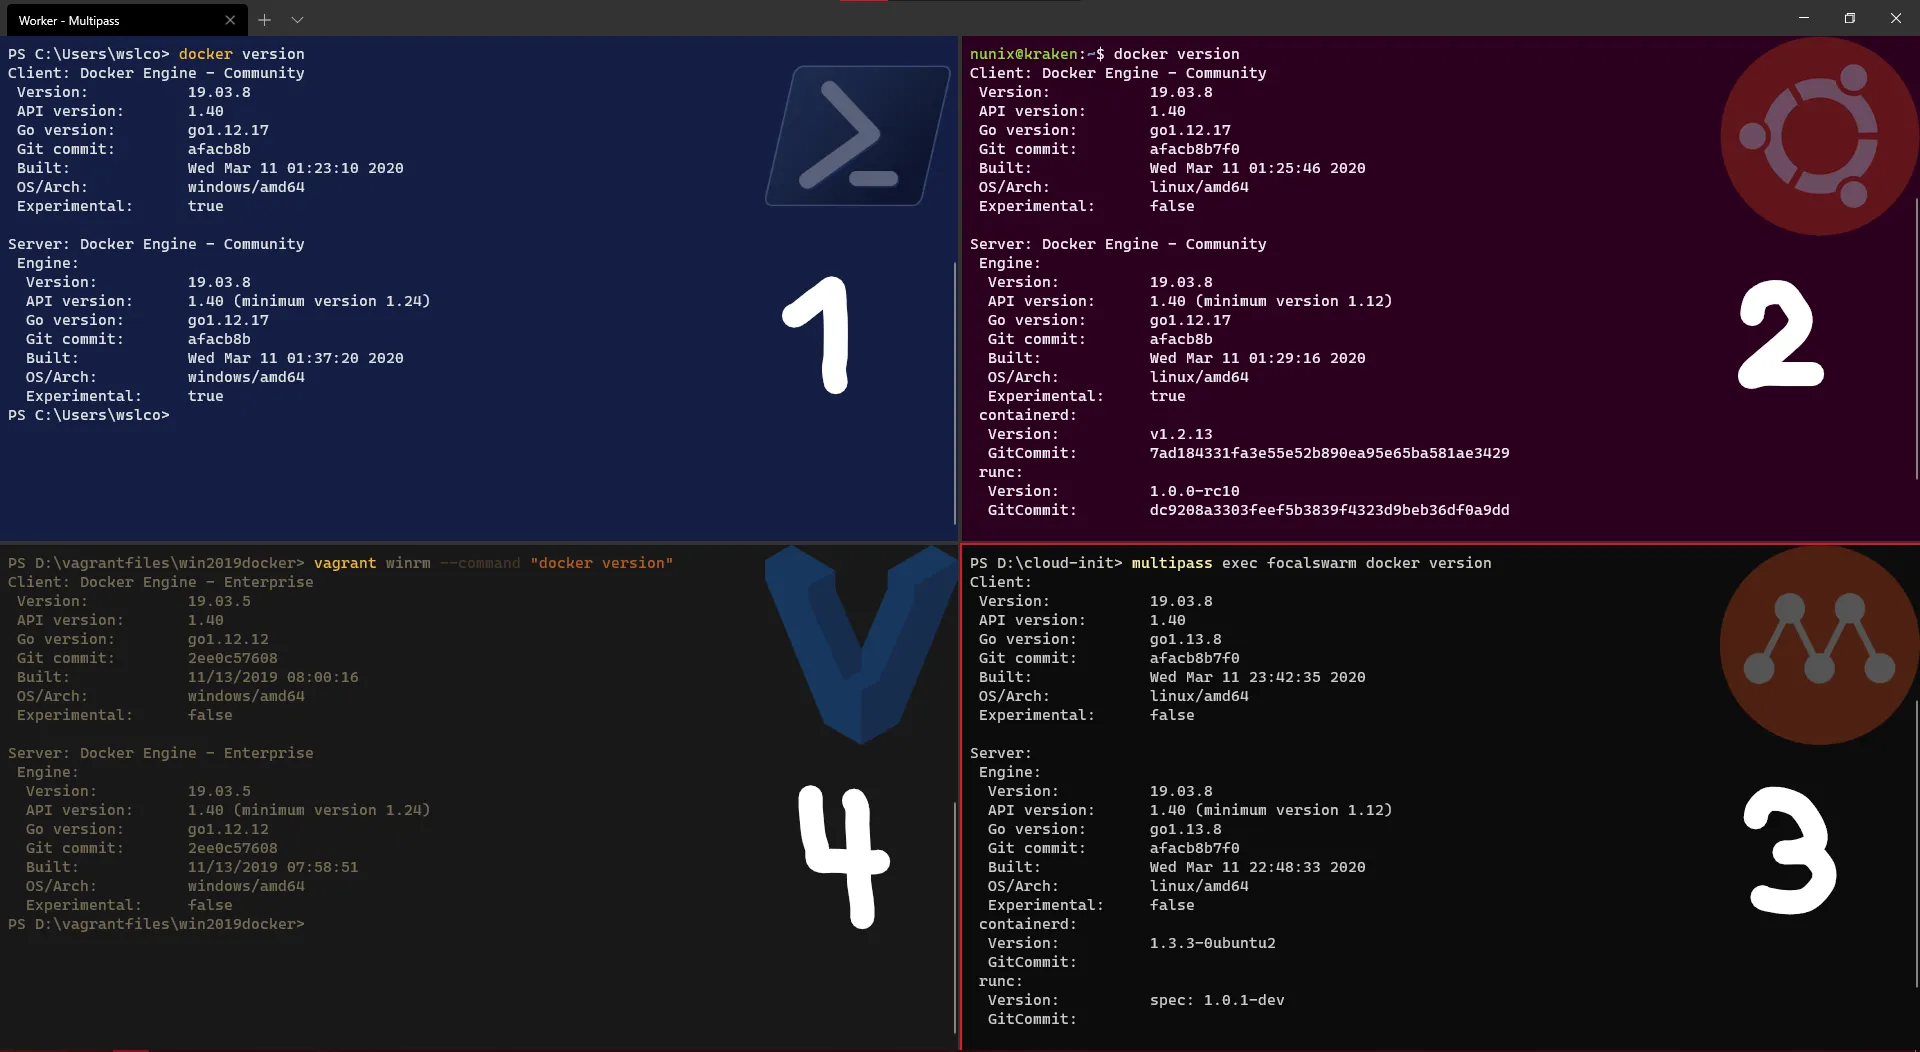
Congratulations! We have now our four nodes: 2 Windows (1 & 4) and 2 Linux (2 & 3).
Docker Swarm: Hybrid is the new normal
Still with me, let’s finally have some Swarm fun.
Out of the four nodes, we will have one as the manager (Windows) with three workers (1x Windows + 2x Linux).
It’s small and really just for testing purpose, but it will be enough for us to have a view on how Swarm behaves and allocated resources.
Portainer: show me thy graphics
And when we speak about resources “visualization”, what better than a Web UI?
Lucky us, there a very neat project that will help us a lot: Portainer.
And lucky us (yes again), they have a Windows installation which relies on mounting the docker named pipe (making it on par with Linux):
# Create a new Visualizer container on the Manager nodedocker run -d -p 9000:9000 -p 8000:8000 --name portainer --restart always -v \\.\pipe\docker_engine_windows:\\.\pipe\docker_engine -v C:\ProgramData\Portainer:C:\data portainer/portainer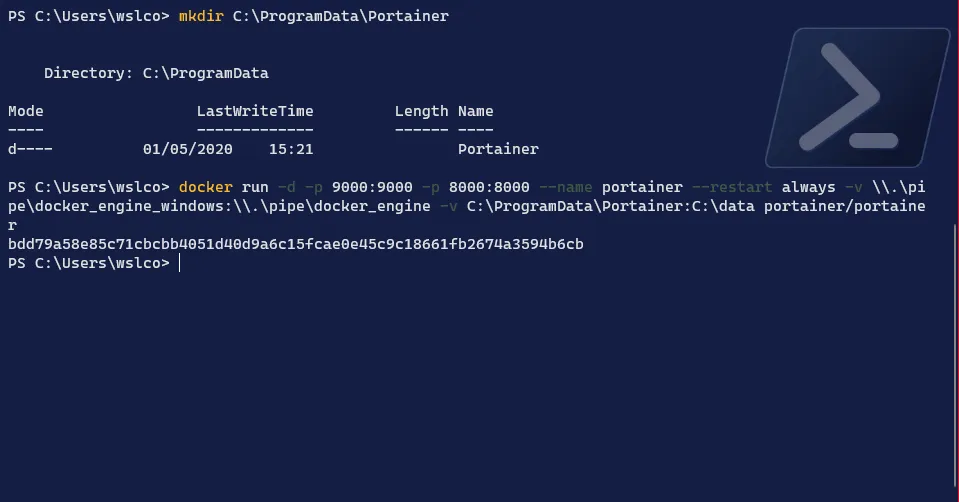
Important: remember that we are still using the “Docker daemon hack”, so if we mount
\\.\pipe\docker_engineit will link to the WSL2 instance (which will become a worker node)
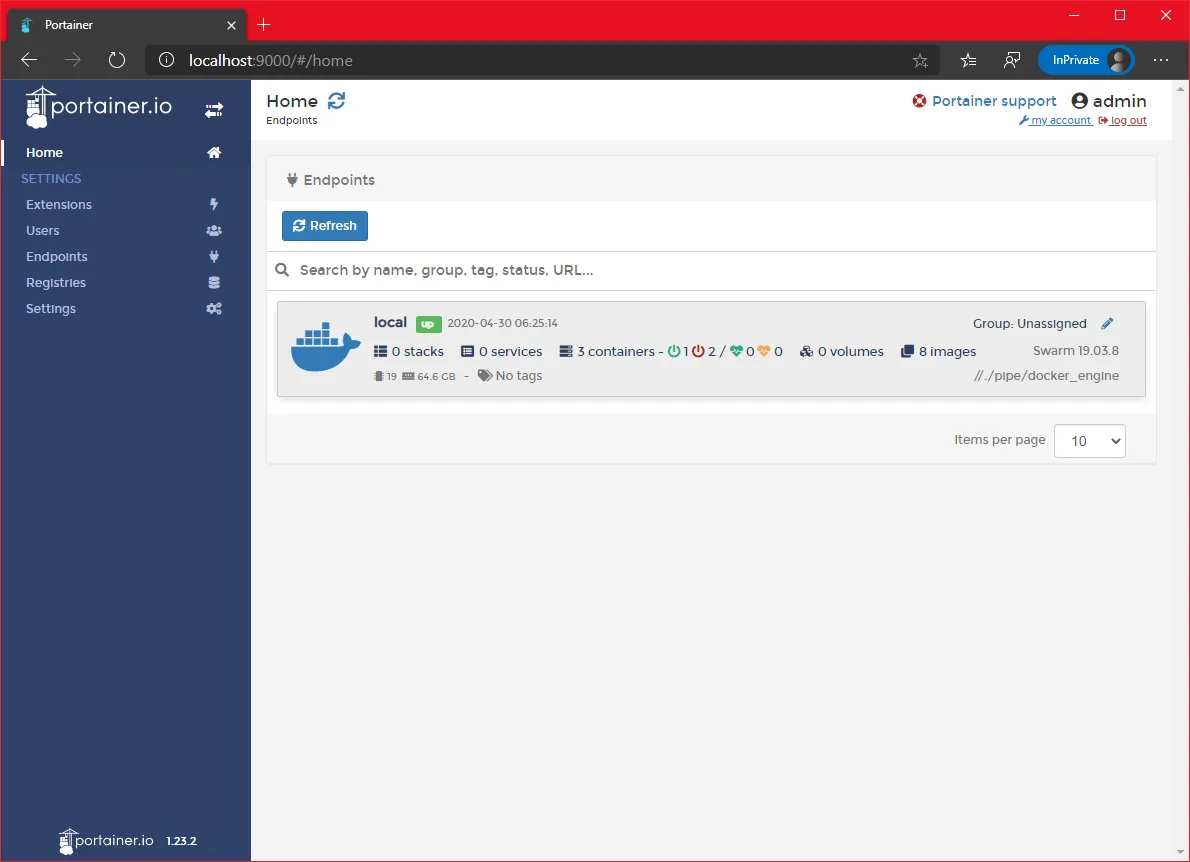
Once the container is running, we can connect to http://localhost:9000
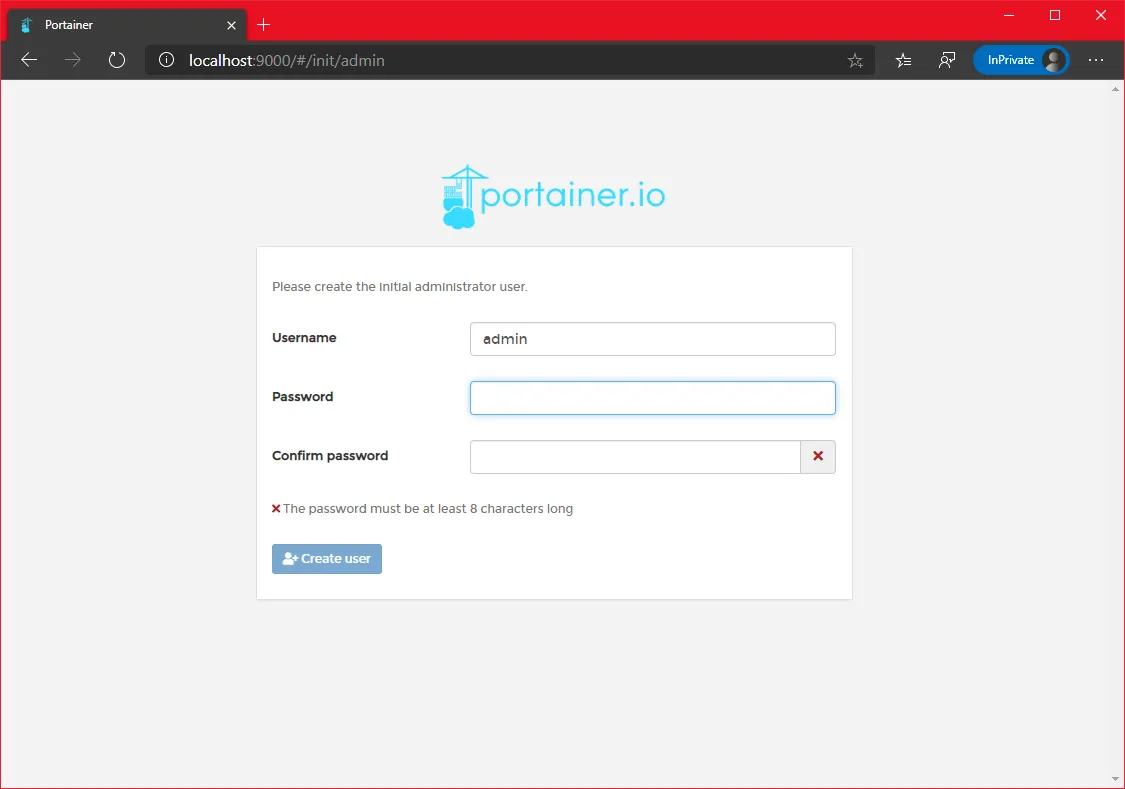
Set a password for the admin account and you’re in
Let’s come back to the interface once we have our swarm created.
Swarm: a Leader arises
We are now ready to start our swarm and the first step is start it on the Manager node.
The Windows with Docker Desktop will be this node. The main reason is that, in terms of network, every other nodes “sees” it. Which is not the case between the other nodes.
We will use the main IP address, which is not optimal but functional for the test we want to do. For a longer term solution, a fix IP will be required.
Let’s create the swarm:
# Get the IP from the "Ethernet" connection$env:MainIP = (Get-NetIPAddress -InterfaceIndex (Get-NetRoute -DestinationPrefix 0.0.0.0/0).ifIndex).IPv4Address# Remove the leading space -> yes, this is tricky$env:MainIP = $env:MainIP.Trim()# Create the swarmdocker swarm init --advertise-addr $env:MainIP --listen-addr ${env:MainIP}:2377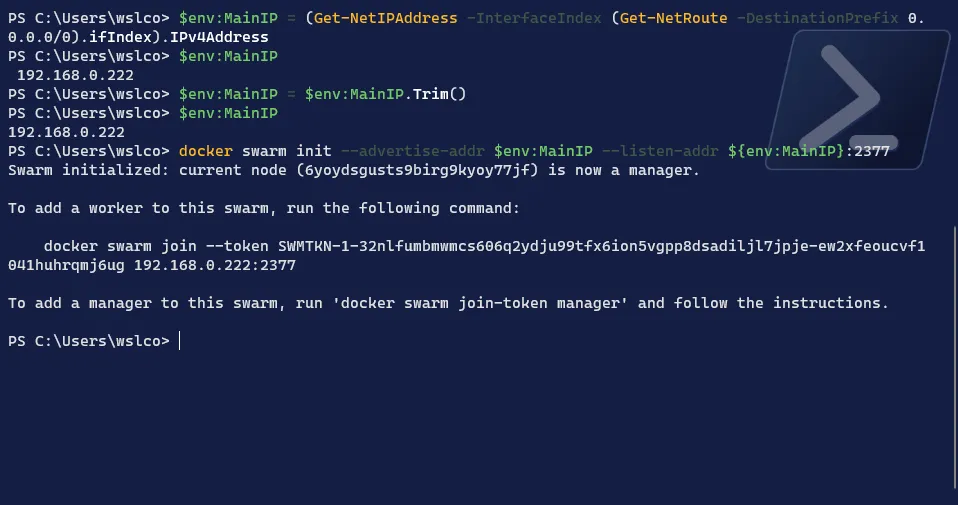
Swarm: hey ho hey ho off to work we go
Now that the Manager node is up and running, it’s time to add the worker nodes to the swarm:
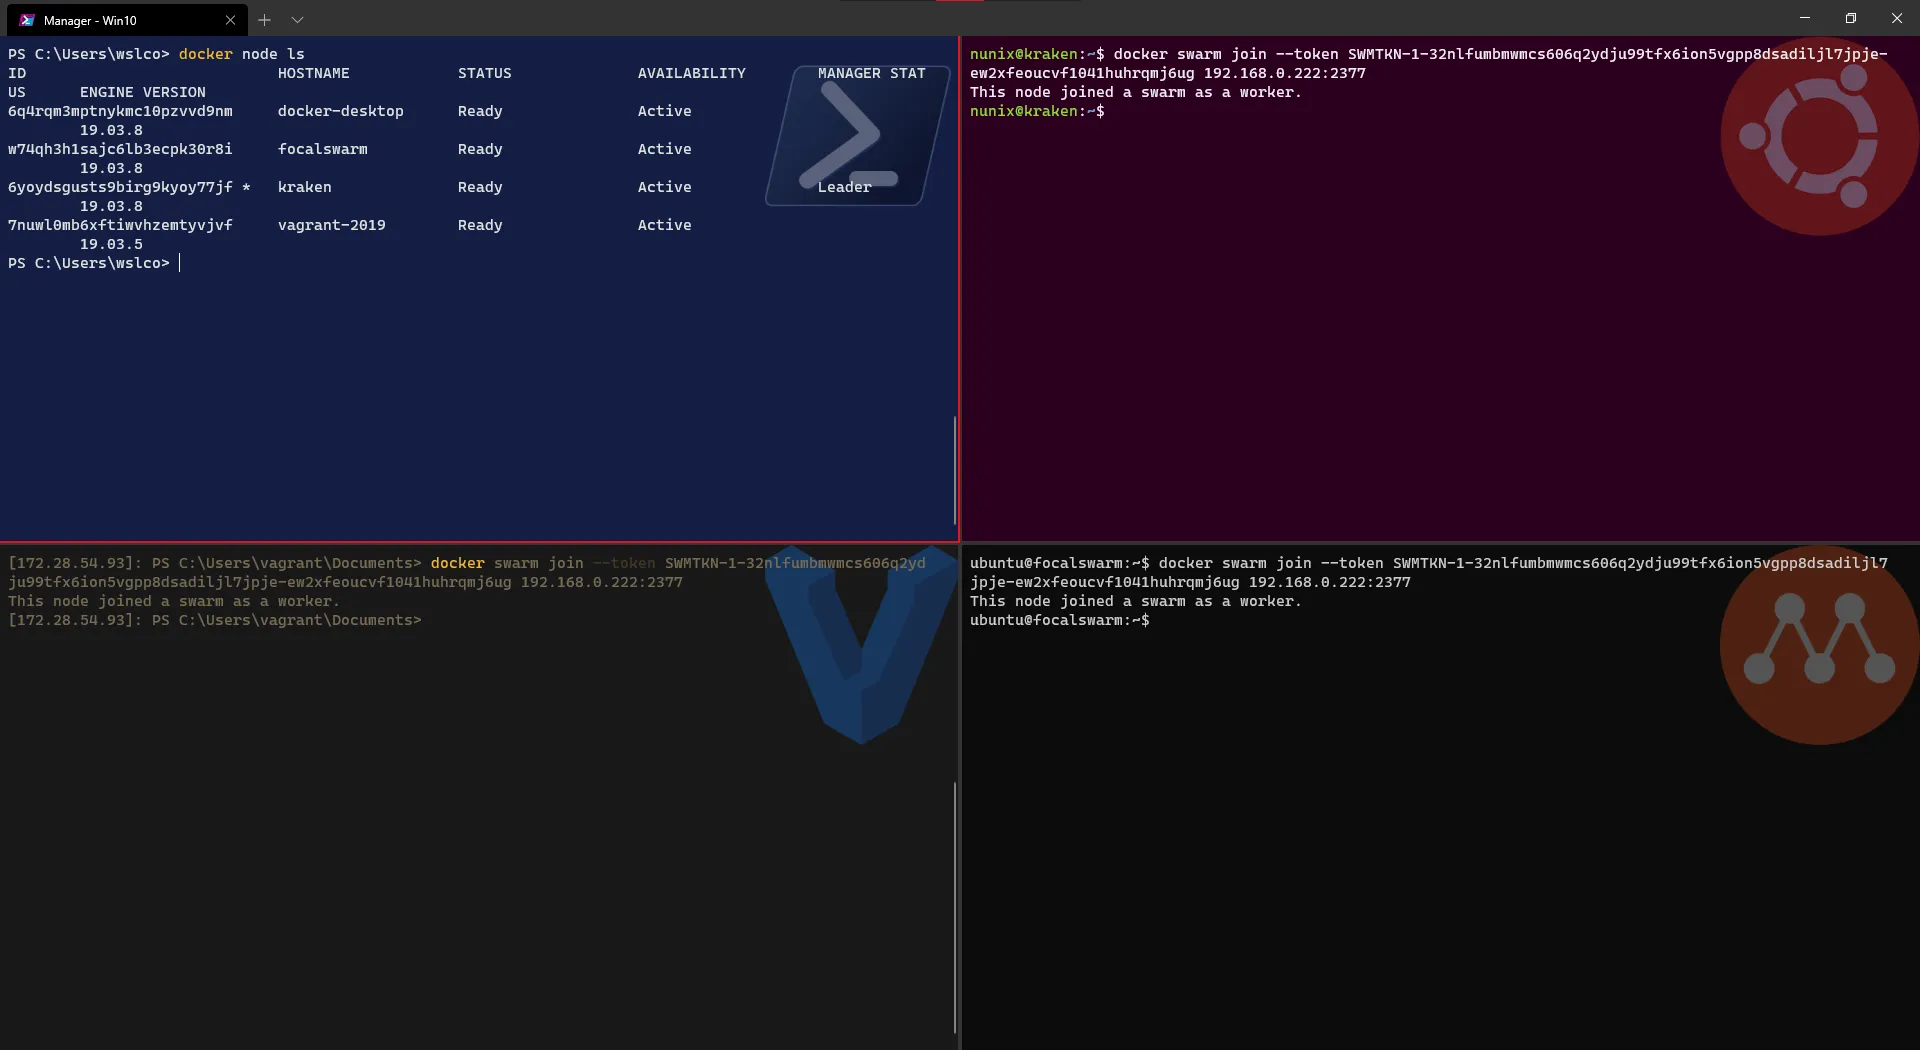
# Add the 3 worker nodes using the swarm join command displayed on the Manager nodedocker swarm join --token <swarm token> <manager IP address>:2377# Check the nodes added from the Manager nodedocker node ls
Great! our swarm is now created and the workers node were added quite fast.
Let’s have a look on Portainer what it looks like:
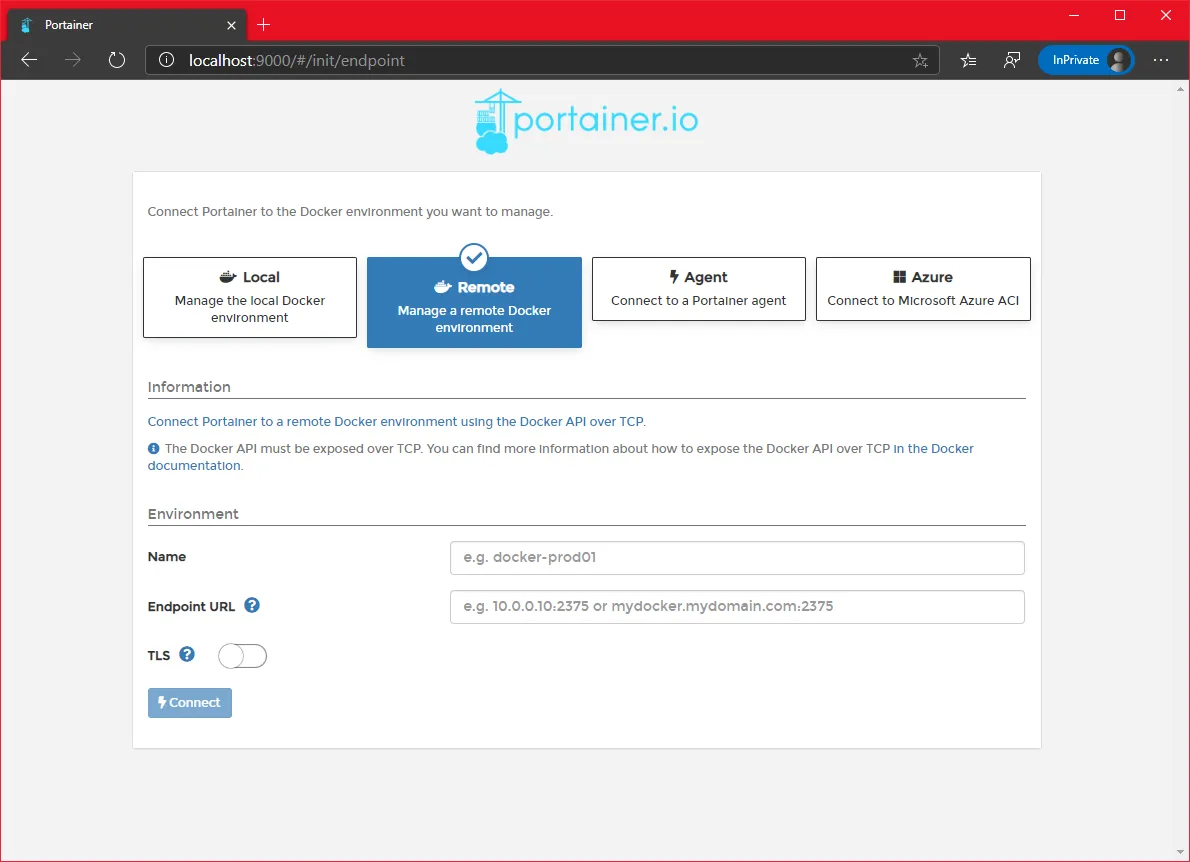
- Select the
Localoption and click connect
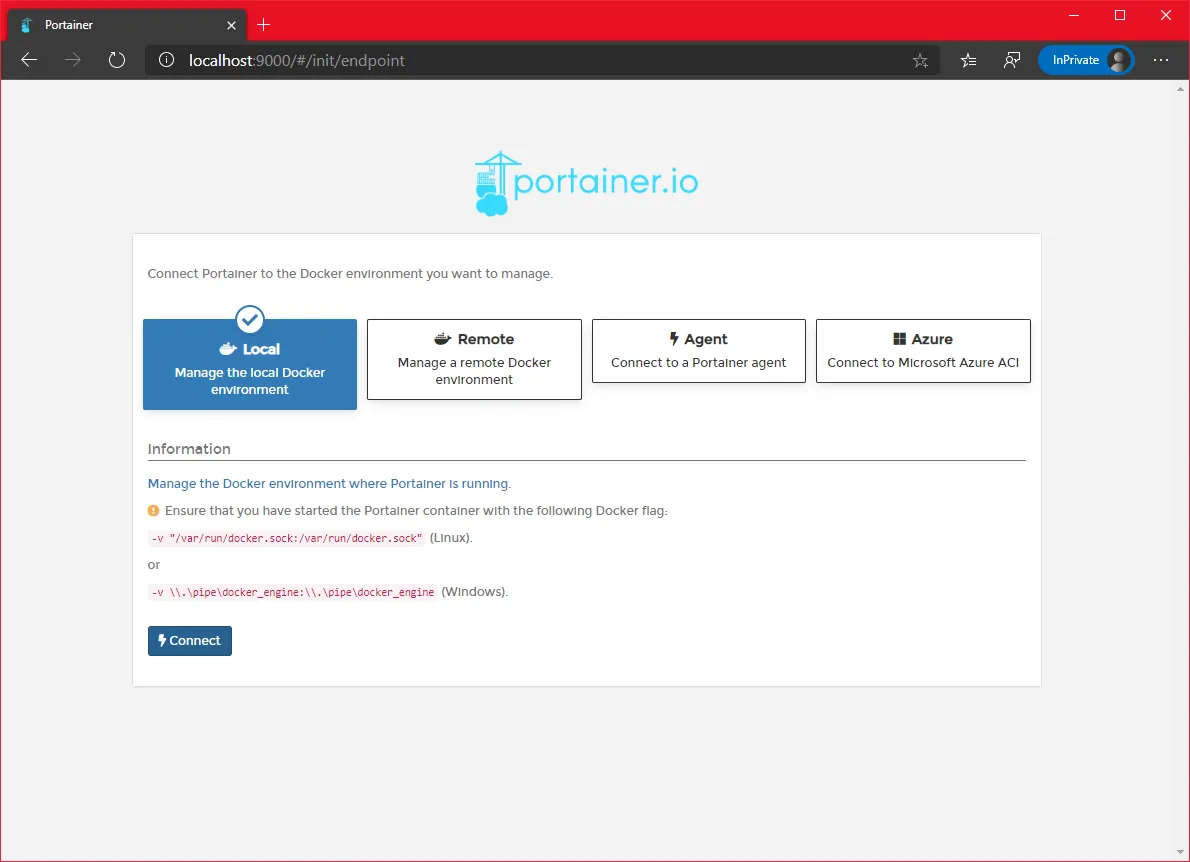
- Click on the endpoint
local
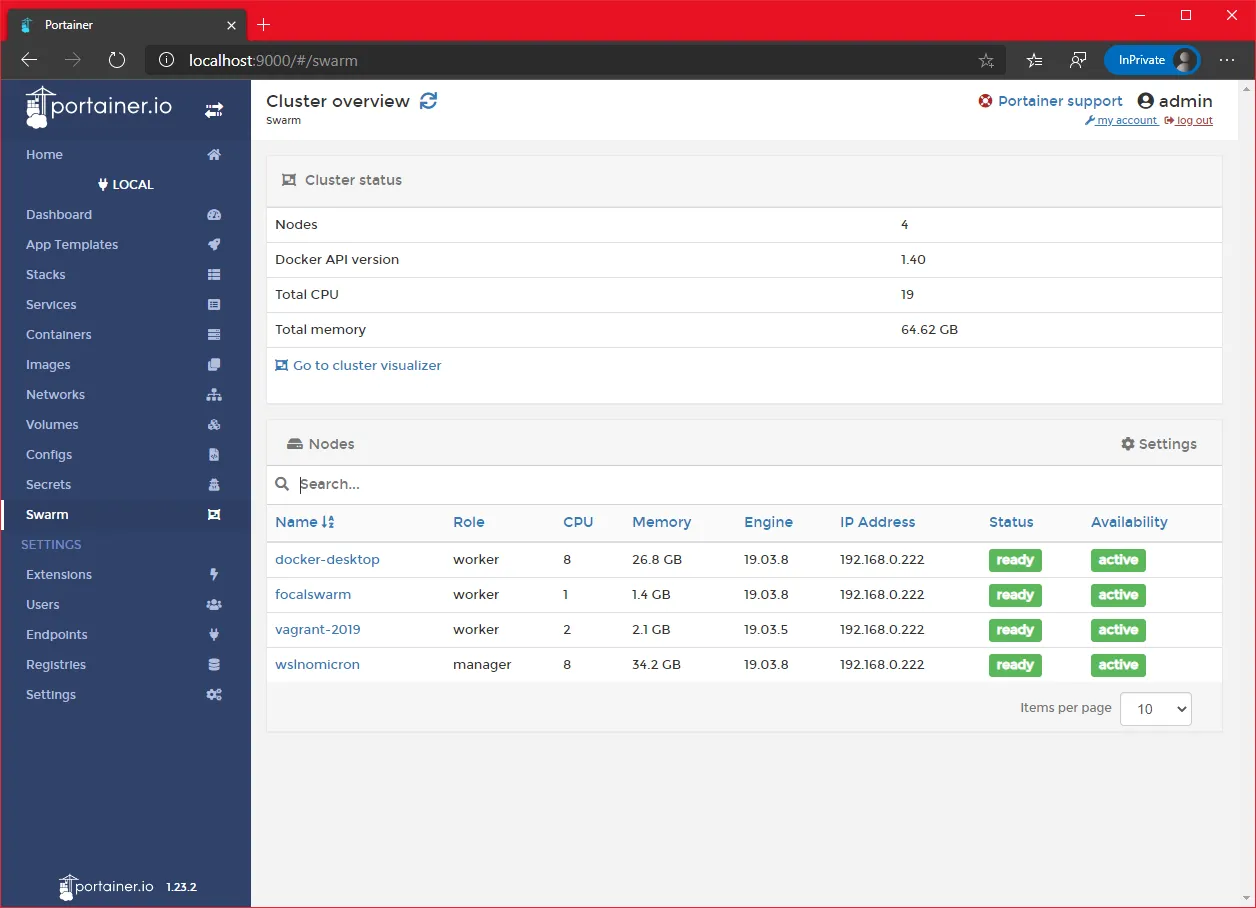
- On the left menu, click on the
swarmoption

- We can see our four nodes
Swarm: labeling is a good thing
As we are in a mixed-os Swarm, docker needs to know to whom it should assign the creation of the containers based on the OS. While Linux containers can run on Windows, it’s not the case for Windows containers on Linux (yet).
Let’s add a label to the nodes with their OS as the value:
# Get a list of the nodesdocker node ls# From the manager node, add the label to the Linux nodesdocker node update --label-add os=linux <linux worker node 1>docker node update --label-add os=linux <linux worker node 2># From the manager node, add the label to the Windows worker nodedocker node update --label-add os=linux <windows worker node># Check that the label has been correctly set docker node inspect <worker node> --format '{{ .Spec.Labels.os }}'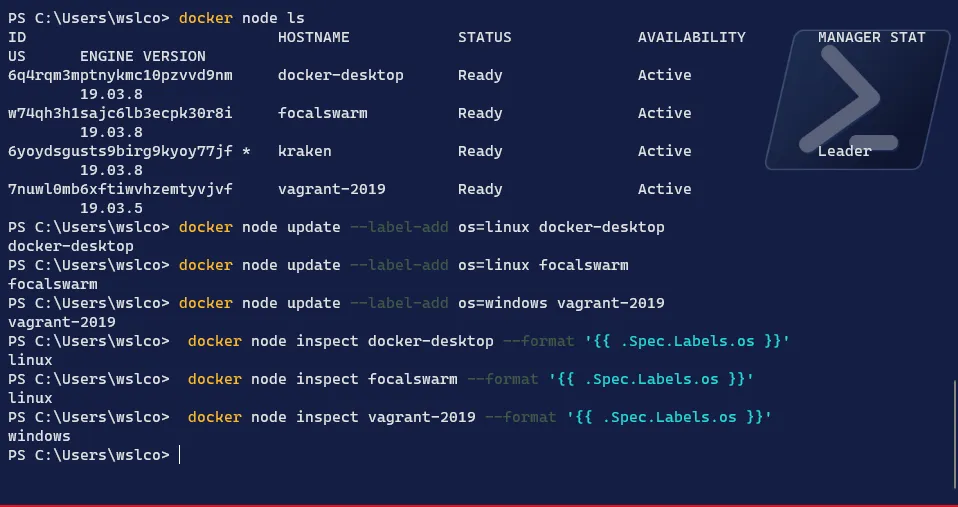
On Portainer, we can click on the link “Go to cluster visualizer” and enable the option “Display node labels”
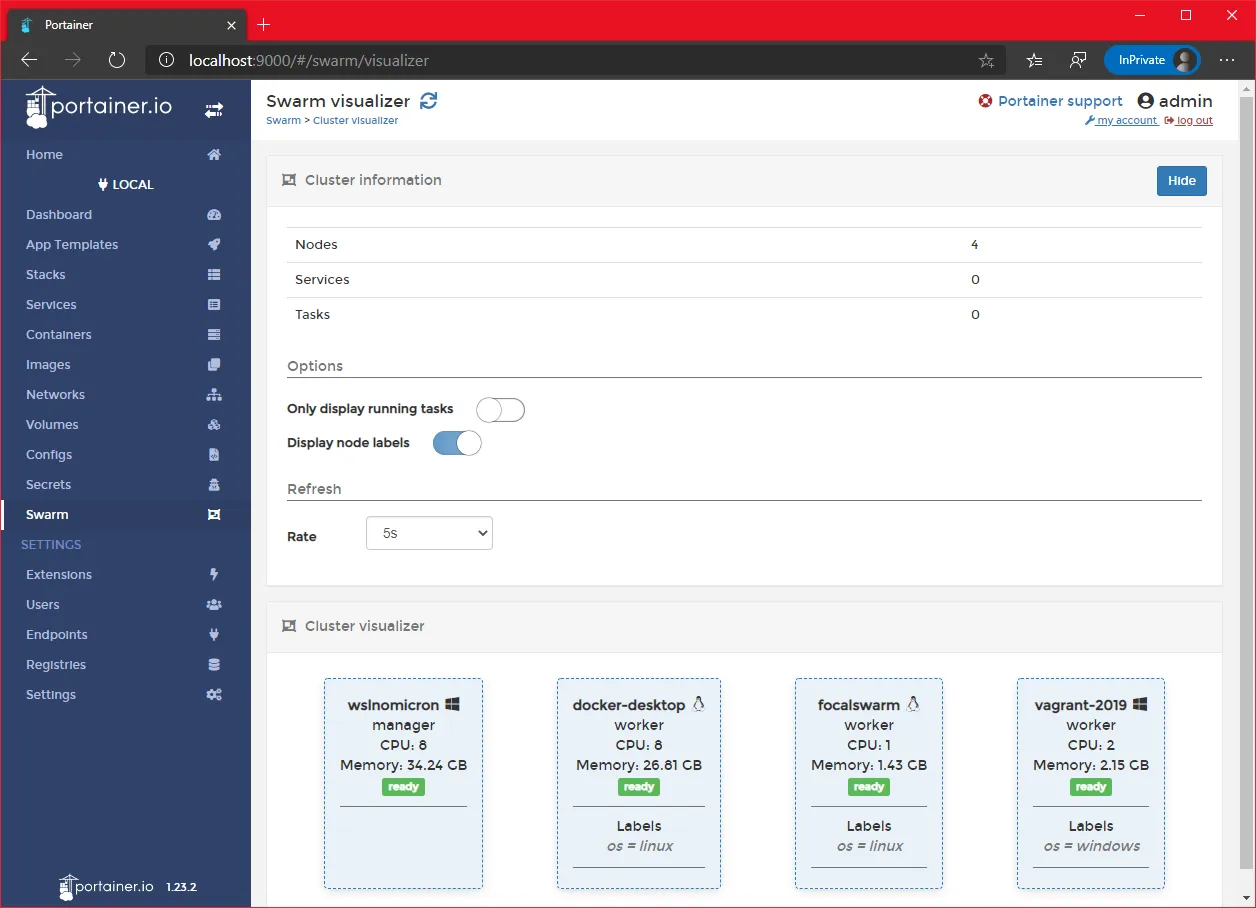
With the labels applied, we can now launch our “mixed application”.
Swarm: building the foundations
We will deploy a (remixed) web app from the list of Awesome Compose: Asp.net (on Windows) and MS SQL (on Linux).
But before we can deploy it, as docker stack does not support building an image during deployment, we will need to build it before and then reference it in our modified compose file.
Note: Quick step prior the building, download (
git clone) the Awesome Compose repository to the directory of your choice.
Let’s build the image:
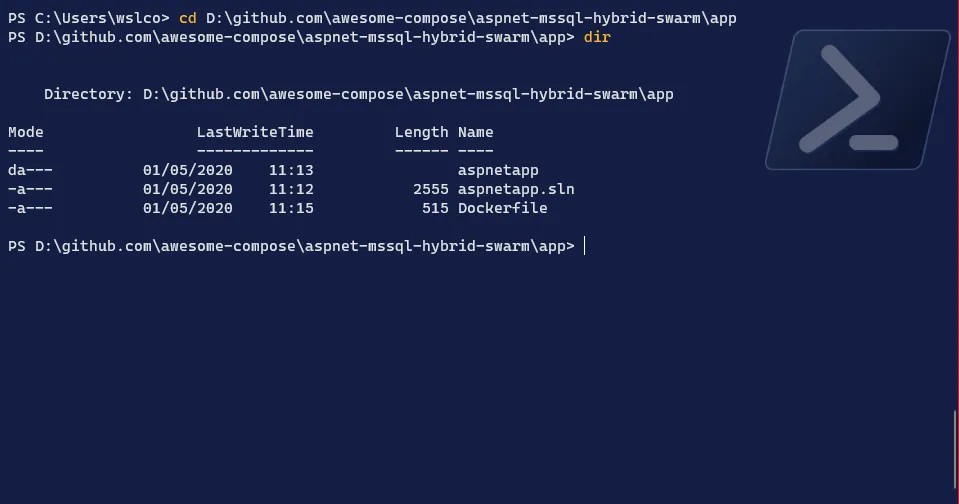
-
Go to the
appdirectory which contains theDockerfileTerminal window # Move to the app directory > in the screenshot you will see a copy of aspnet-mssql directorycd <path to Awesome Compose directory>/aspnet-mssql/app# List the content and ensure the Dockerfile is theredir
-
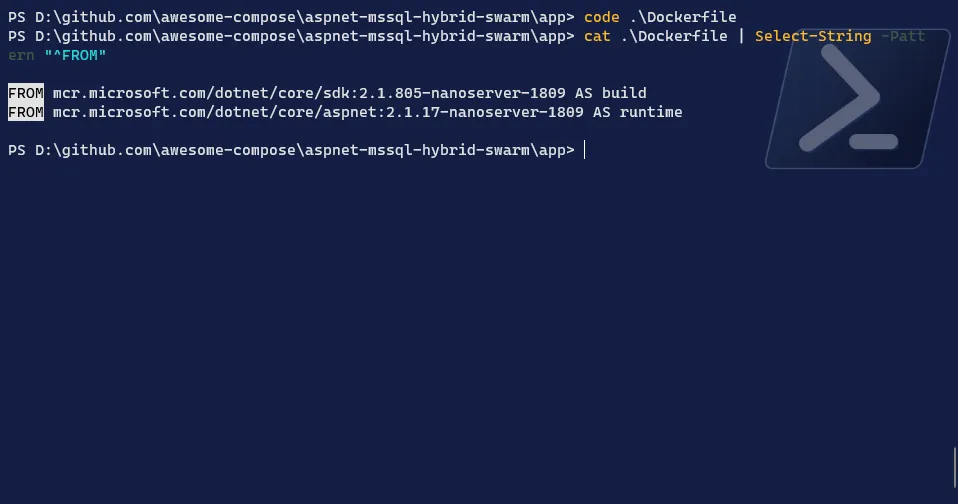
Edit the
DockerfileTerminal window # Open the Dockerfile in the editor of your choice > I will use VSCodecode Dockerfile# Modify both FROM lines in order to have the Windows image tagsFROM mcr.microsoft.com/dotnet/core/sdk:3.1.201-nanoserver-1909 AS build...FROM mcr.microsoft.com/dotnet/core/aspnet:3.1.3-nanoserver-1909 AS runtime...# Save the file
-
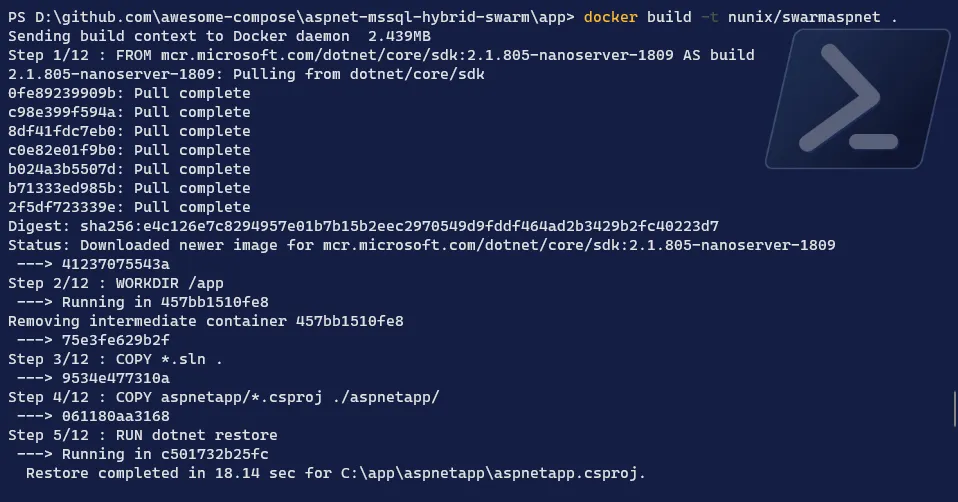
Build the image
Terminal window # Build the image with the tag you want > I will name swarmaspnetdocker build -t <your DockerHub repository name>/<image name>:latest .
-
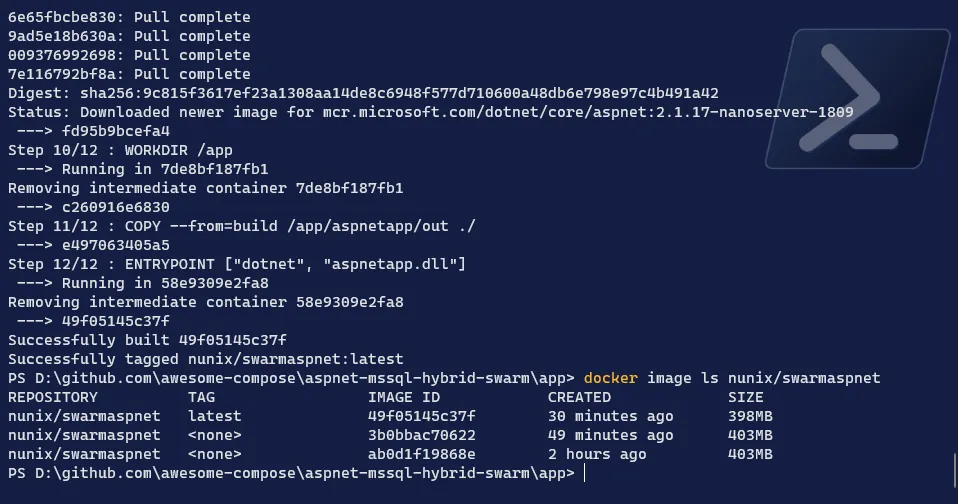
Check the image
Terminal window # Check if the image has been correctly createddocker image ls <your DockerHub repository name>/<image name>
-
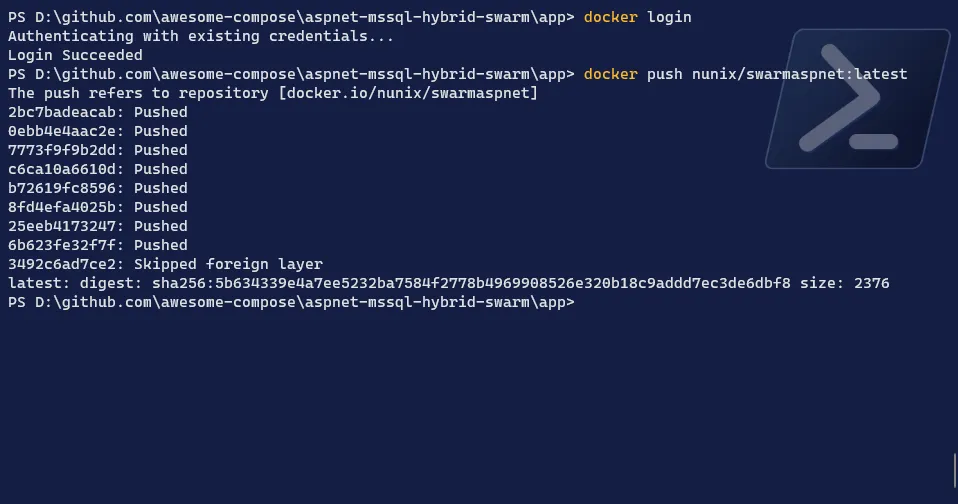
Finally, we will need to push the image as it’s living only in our Manager node but we need it on our Windows Worker
Terminal window # Login to Docker Hubdocker login# Push the imagedocker push <your DockerHub repository name>/<image name>:latest
We have now all the components to deploy our application in a mixed environment.
Swarm: the “divide to conquer” deployment
Let’s deploy our application from the Manager node:
-
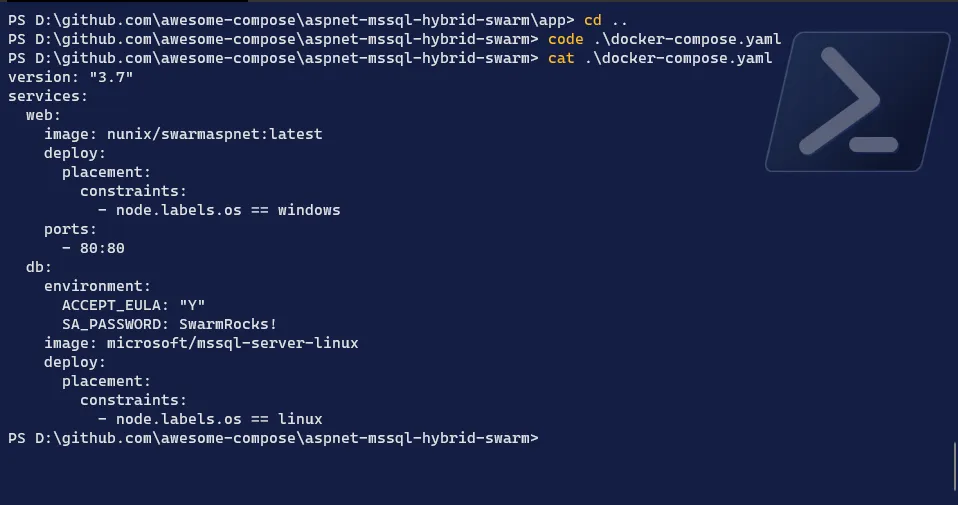
Edit the compose file to add the image reference and add constraints on the labels we created
Terminal window # Move one directory up, where the compose file is locatedcd ..# Edit the compose file with your favorite editorcode docker-compose.yaml# Remove the build line and add the reference to your image...web:image: <your DockerHub repository name>/<image name>:latest...# Add the constraint to Windows OS for the WEB service...web:image: nunix/swarmaspnet:latestdeploy:placement:constraints:- node.labels.os == windows...# Add the constraint to Linux OS for the DB service...db:image: microsoft/mssql-server-linuxdeploy:placement:constraints:- node.labels.os == linux...# Save the file
-
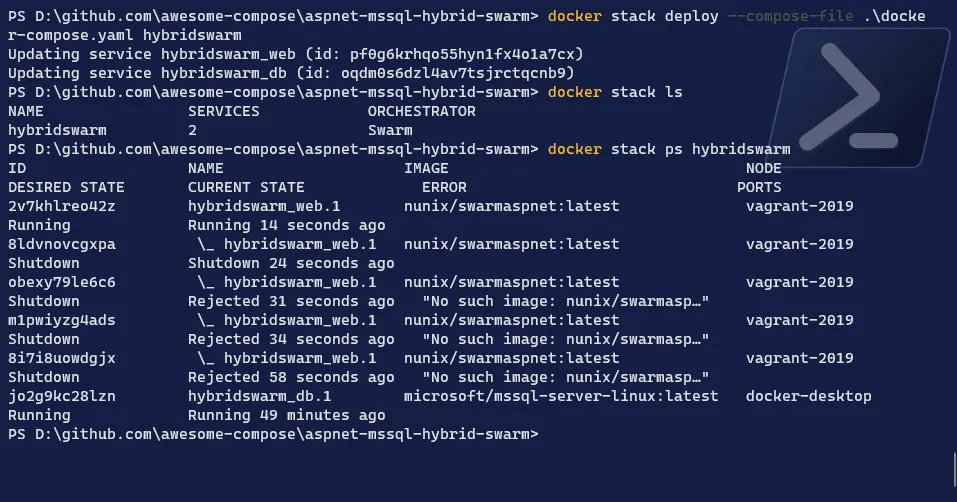
Deploy the application
Terminal window # Deploy the application stack > I will name it hybridswarmdocker stack deploy --compose-file docker-compose.yaml <application name># Check if the stack has been correctly deployeddocker stack ls# Check the services created with our deploymentdocker stack ps <application name>
-
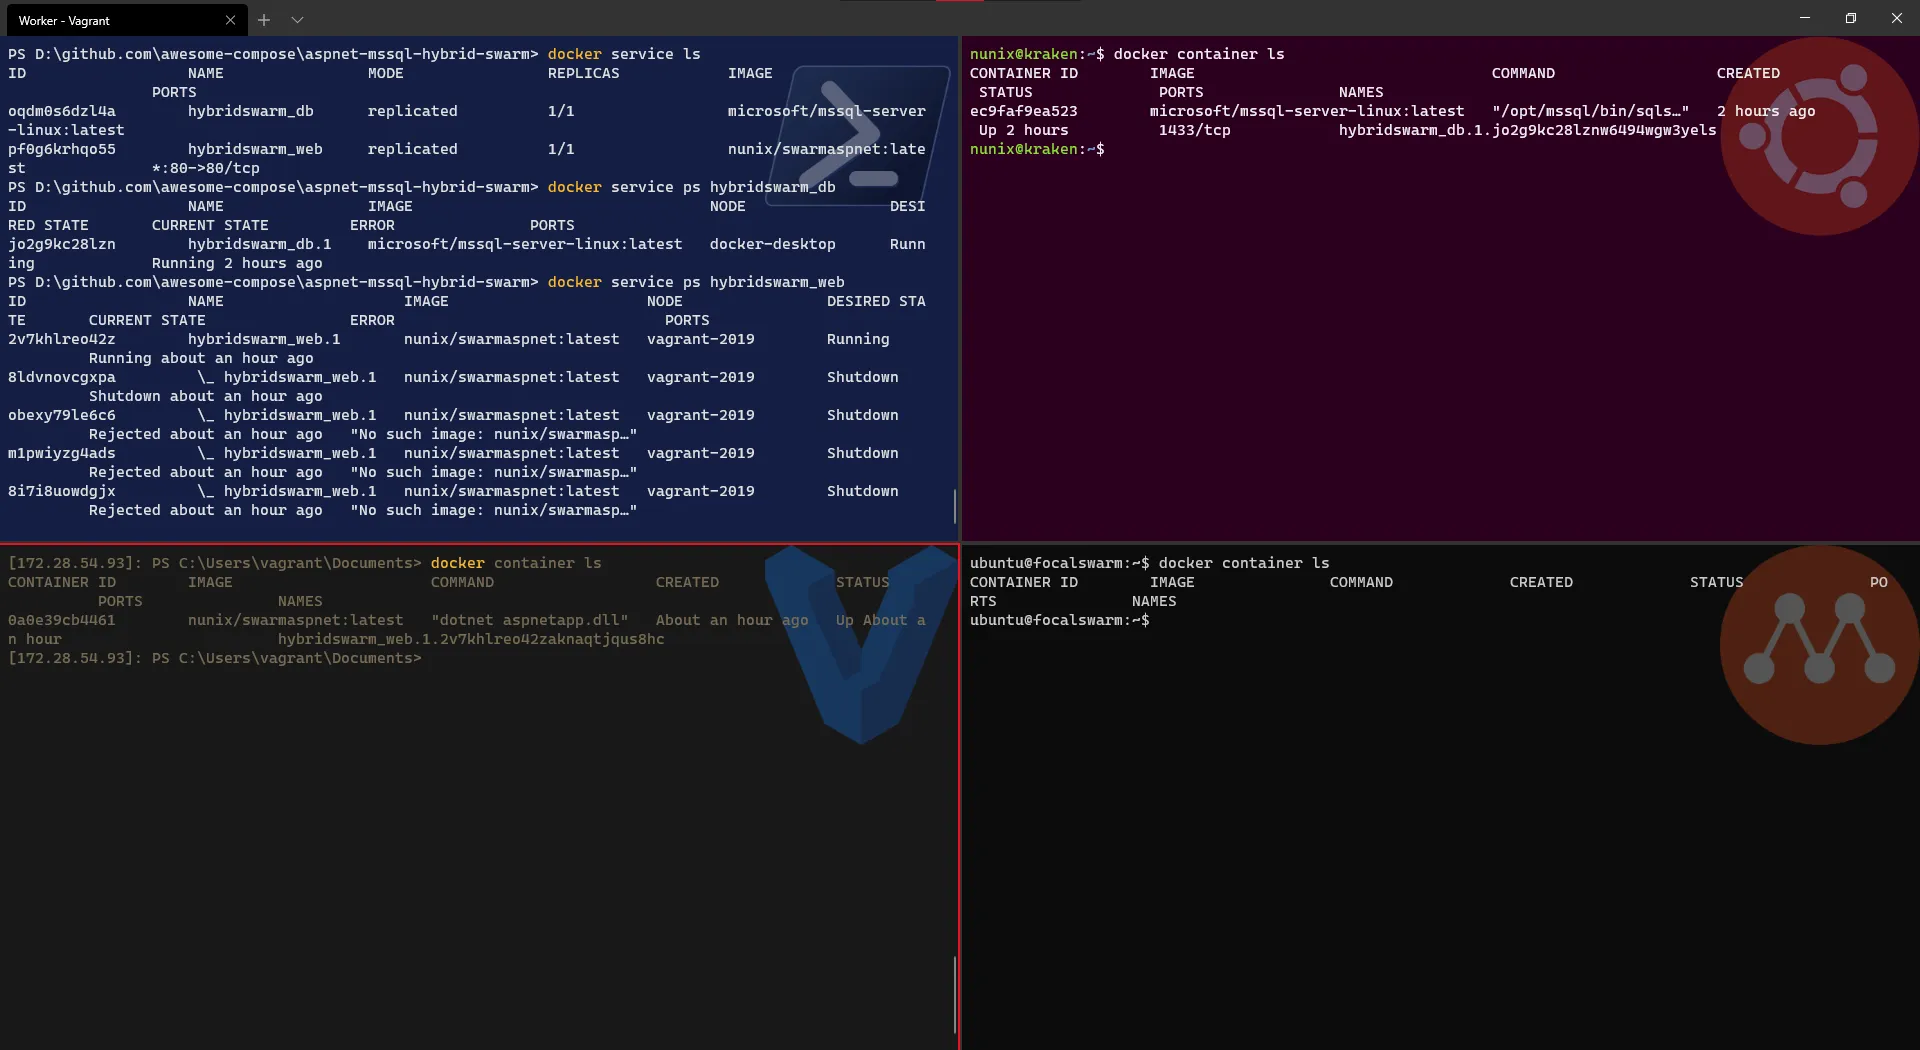
Check the services and the status on the nodes
Terminal window # List the servicesdocker service ls# Check on which node the DB service has been created > should be a Linux nodedocker service ps <DB service name># Check on which node the WEB service has been created > should be the Windows nodedocker service ps <WEB service name># [Optional] Check the containers created on worker nodedocker container ls
- Check on Portainer what is displayed > for a cleaner view, enable the “Only display running tasks” option
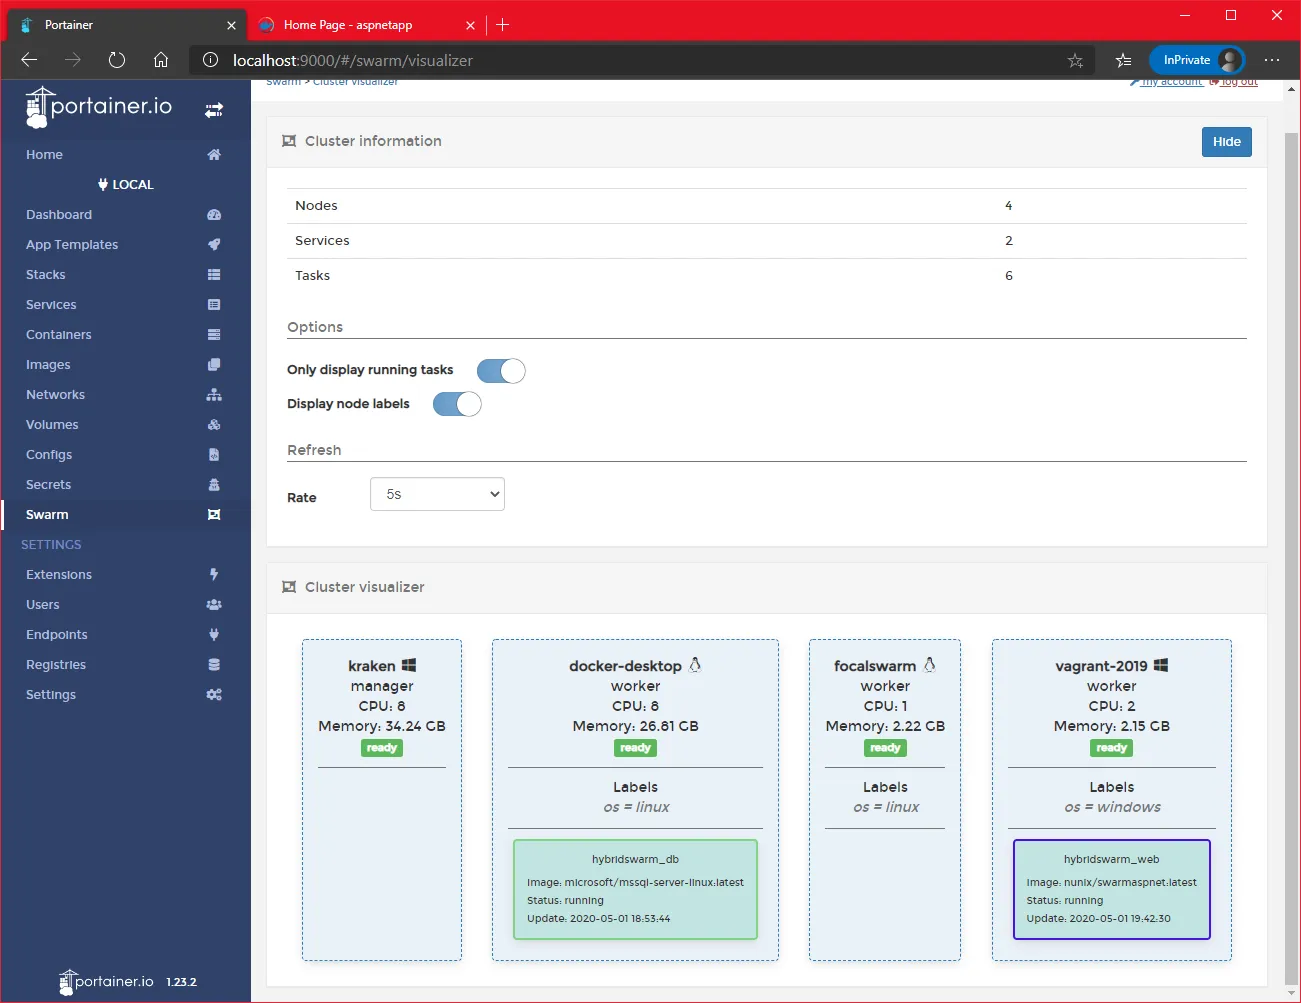
- Finally, open a browser and enter the IP of the Windows worker node to see the website !
And here we have, an application deployed in an hybrid infrastructure, and the whole thing running on a single computer and Windows 10.
Conclusion
Like I said in the introduction, while the concept might help you, the mix of technologies was really to showcase the possibilities of Windows 10 and Docker Desktop.
The combo opens the door to real opportunities, and for me, it’s primarily an amazing learning platform.
I really hope you will have as much fun as me, and at the same time you learnt something.
>>> Nunix out <<<
Bonus 1: scaling one node at the time
Well, in our setup, there is one Linux worker node that was not used, let remediate to that and scale the DB service to be replicated to two instances:
# List the servicesdocker service ls# Scale the DB service to have two replicasdocker service scale <DB service name>=2# Check if the service has been correctly replicateddocker service ls# [Optional] Check the containers created on each Linux worker nodedocker container ls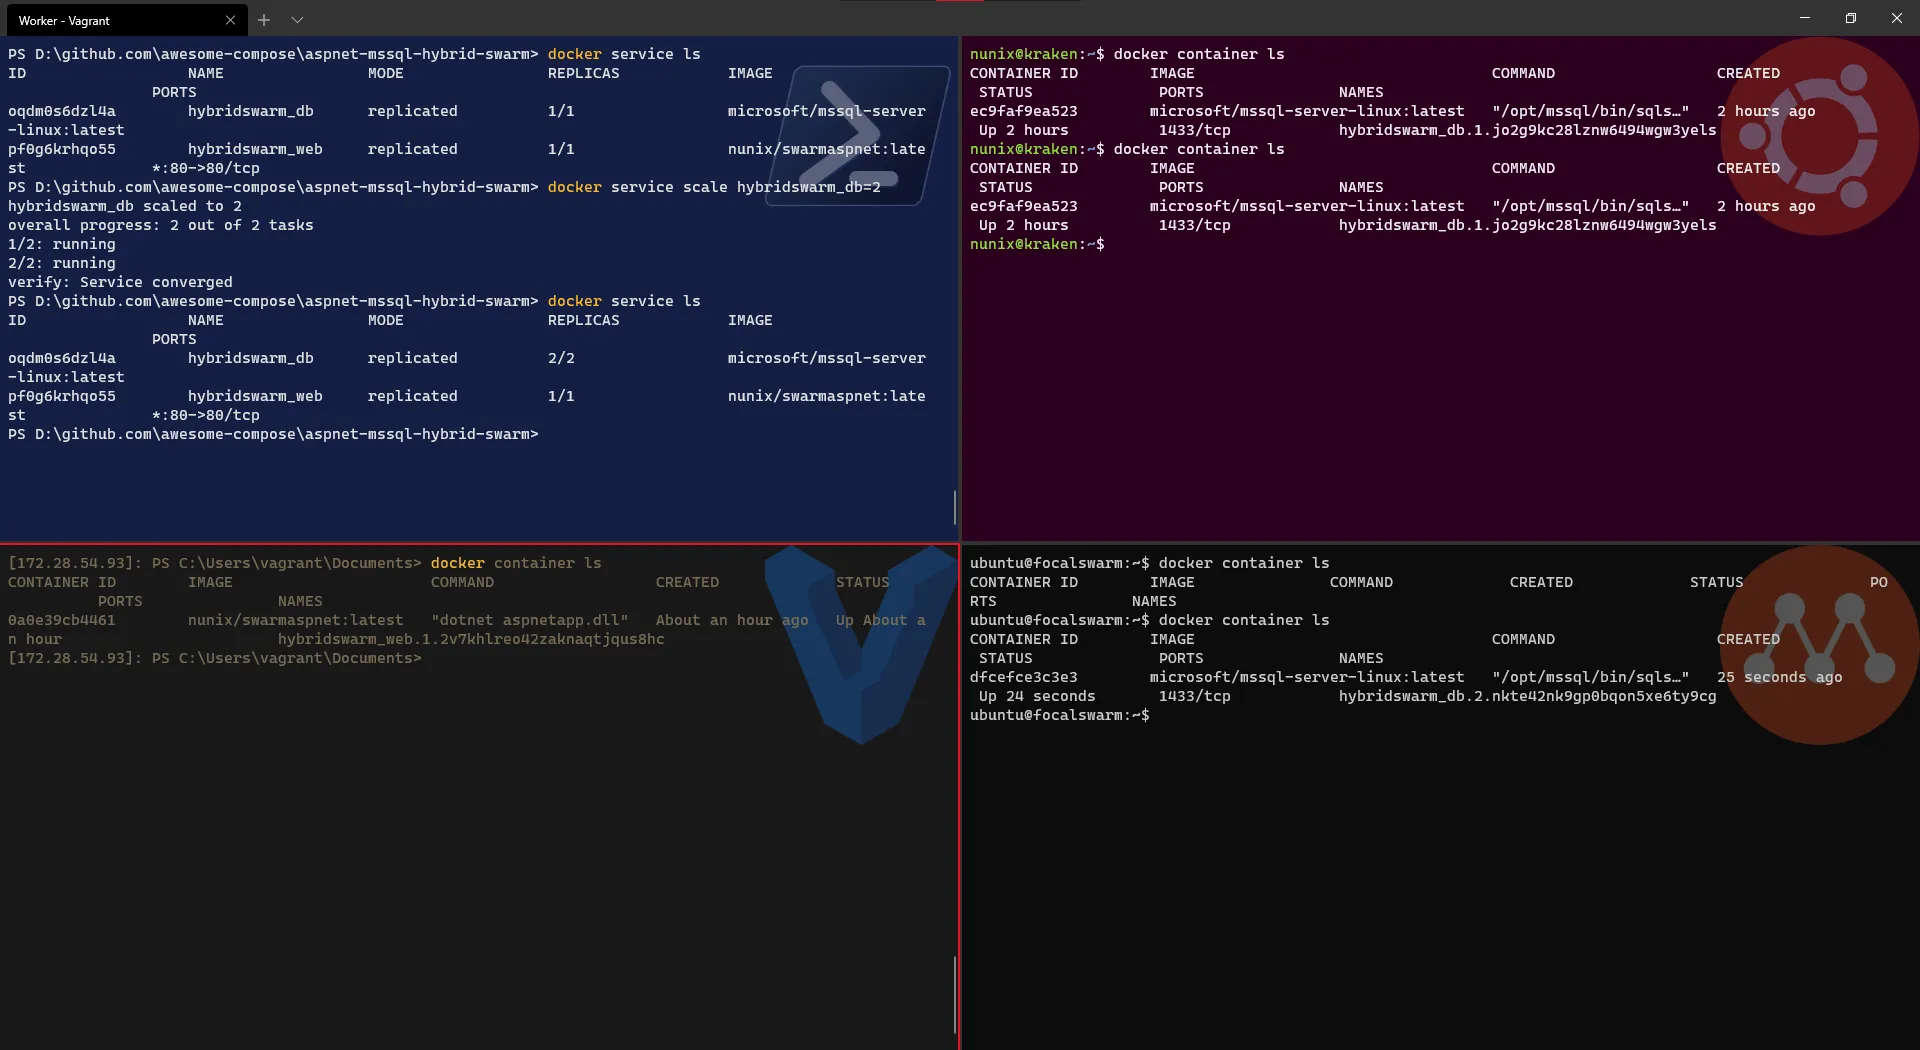
Check also in Portainer what is displayed
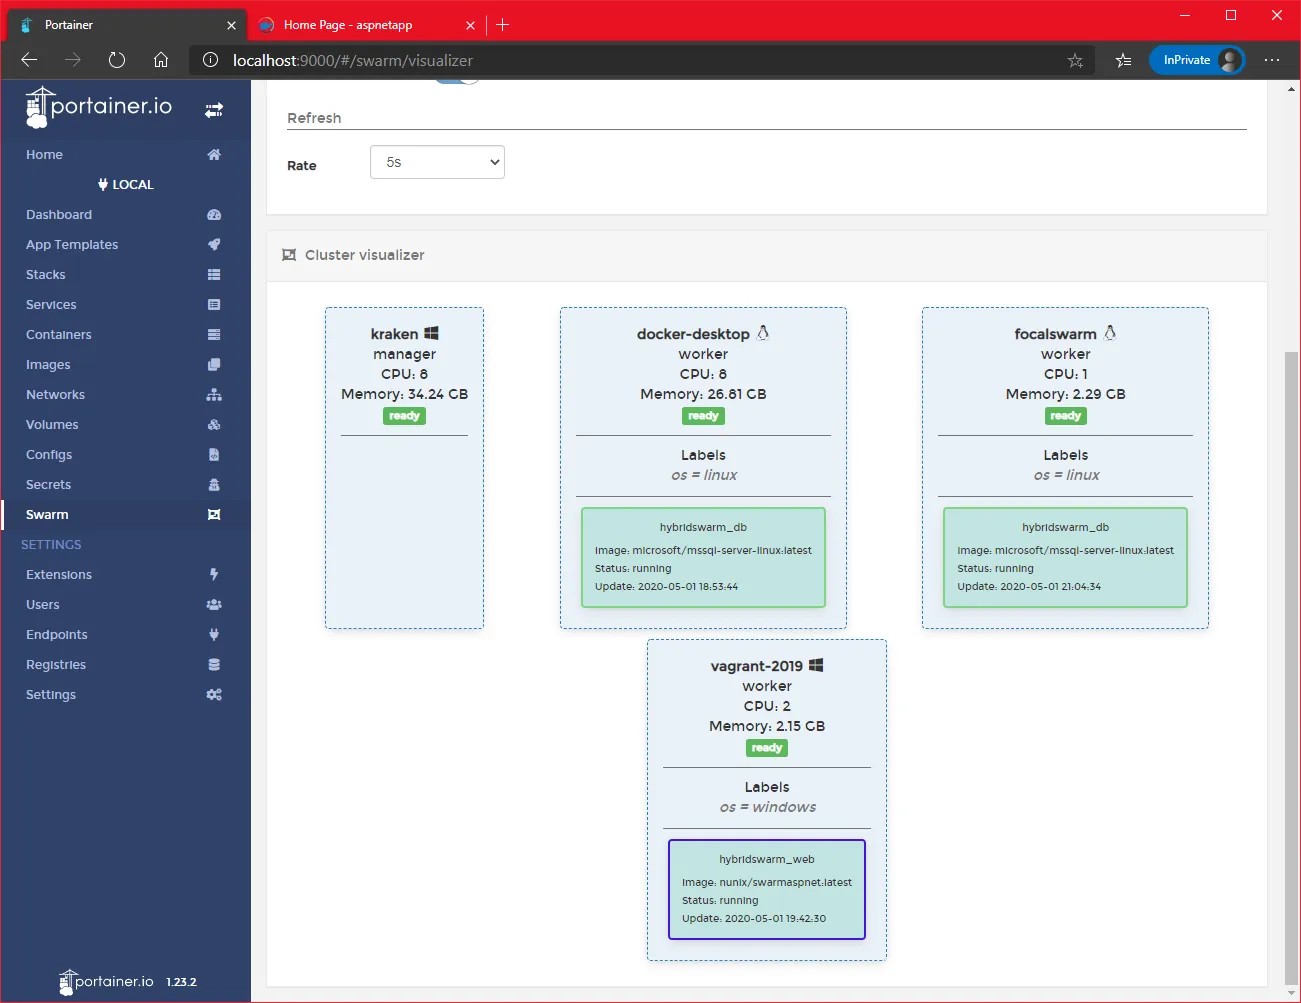
And voilà, we could replicate a service and now we do have redundancy for the DB service (at least in terms of nodes).