WSL2+K3d: an HA Arkade game
Introduction
Let’s play a fast paced arcade game where masters are keeping their castle with guards and they need to build as fast as possible new parts in their castle.
Now you’re thinking the confinement finally got me and I’m loosing it… Well my friends, while true, let’s have fun with the latest K3d version 3.0 and Arkade where we will actually “play” the game above.
Prerequisites
As usual, we all have different starting points, so I will list below the prerequisites with their respective links.
I will not explain here their installation, so pause here if needed and come back once everything has been installed and you are ready to go.
Here is the shopping list:
-
OS: Windows 10 with the latest update (2004) or if you reading it now, the Insider Release Preview is the minimum
-
Win10 Features:
-
WSL2: a Store or Custom distro
-
[Optional] Windows Terminal
-
[Optional] Visual Studio Code
You might wonder why I do not install Docker Desktop and go for a “local” install instead? The reason is simple: we will need to publish ports and K3d creates its own docker network. However, as the Docker Desktop WSL2 backend is running itself inside a WSL2 distro, the network created is not reachable from Windows or even another distro.
This might evolve, but for the time being let’s have docker installed “locally” inside the WSL2 distro of your choice.
Stage 1: let’s build a castle
The first step, is to install and run K3d. However, we will be using the latest version: 3.0 (in beta at the time of this writing) which will allow us to create an High Availability (HA) cluster.
You’re reading this right, and we will even test it. But that’s a later stage in the game, for the time being, let’s get K3d:
- Ensure docker is running
# Check the docker versiondocker version# Check on which OS it's installed > this should NOT show "Docker Desktop"docker info --format '{{ .OperatingSystem }}'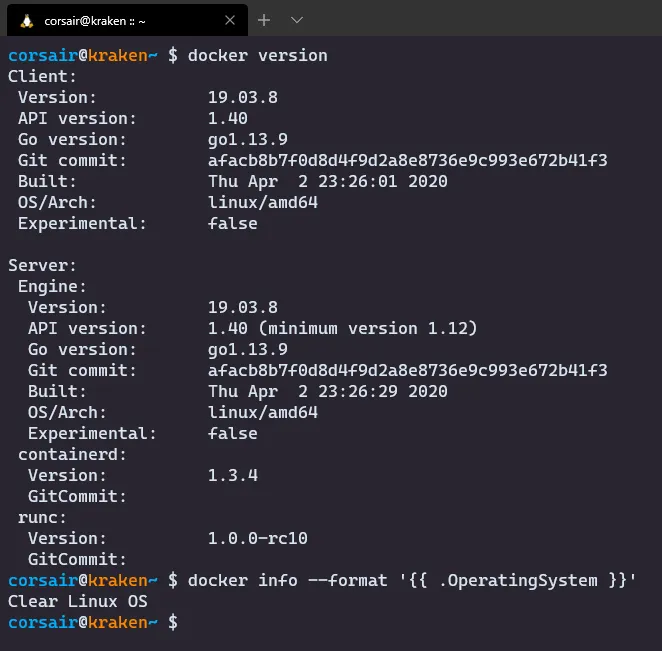
- Install the latest version of K3d
# Run the installation scriptcurl -s https://raw.githubusercontent.com/rancher/k3d/master/install.sh | TAG=v3.0.0-beta.1 bash# Check the options availablek3d --help# Check the versionk3d version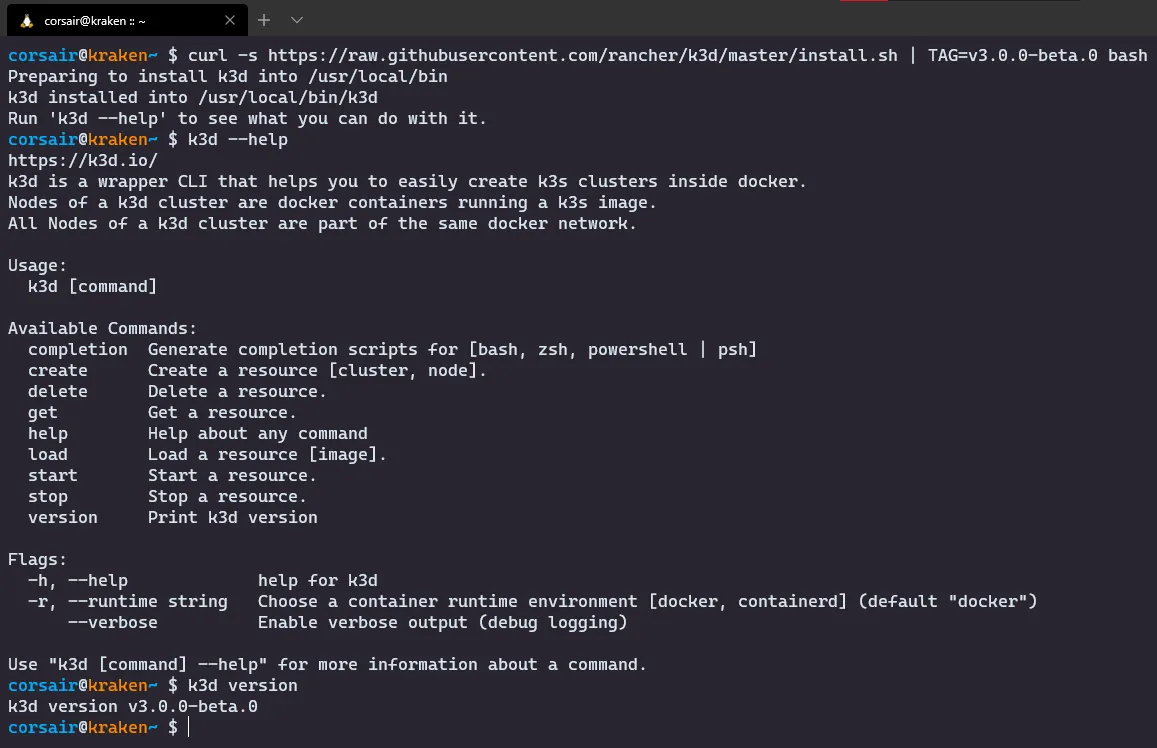
- Create a first cluster with the default settings for connectivity testing
# Create a single node clusterk3d create cluster <cluster name># Set the KUBECONFIG variableexport KUBECONFIG=$(k3d get kubeconfig <cluster name>)# Check if the cluster is runningkubectl cluster-info# [Optional] Open a browser and enter the URL https://localhost:6443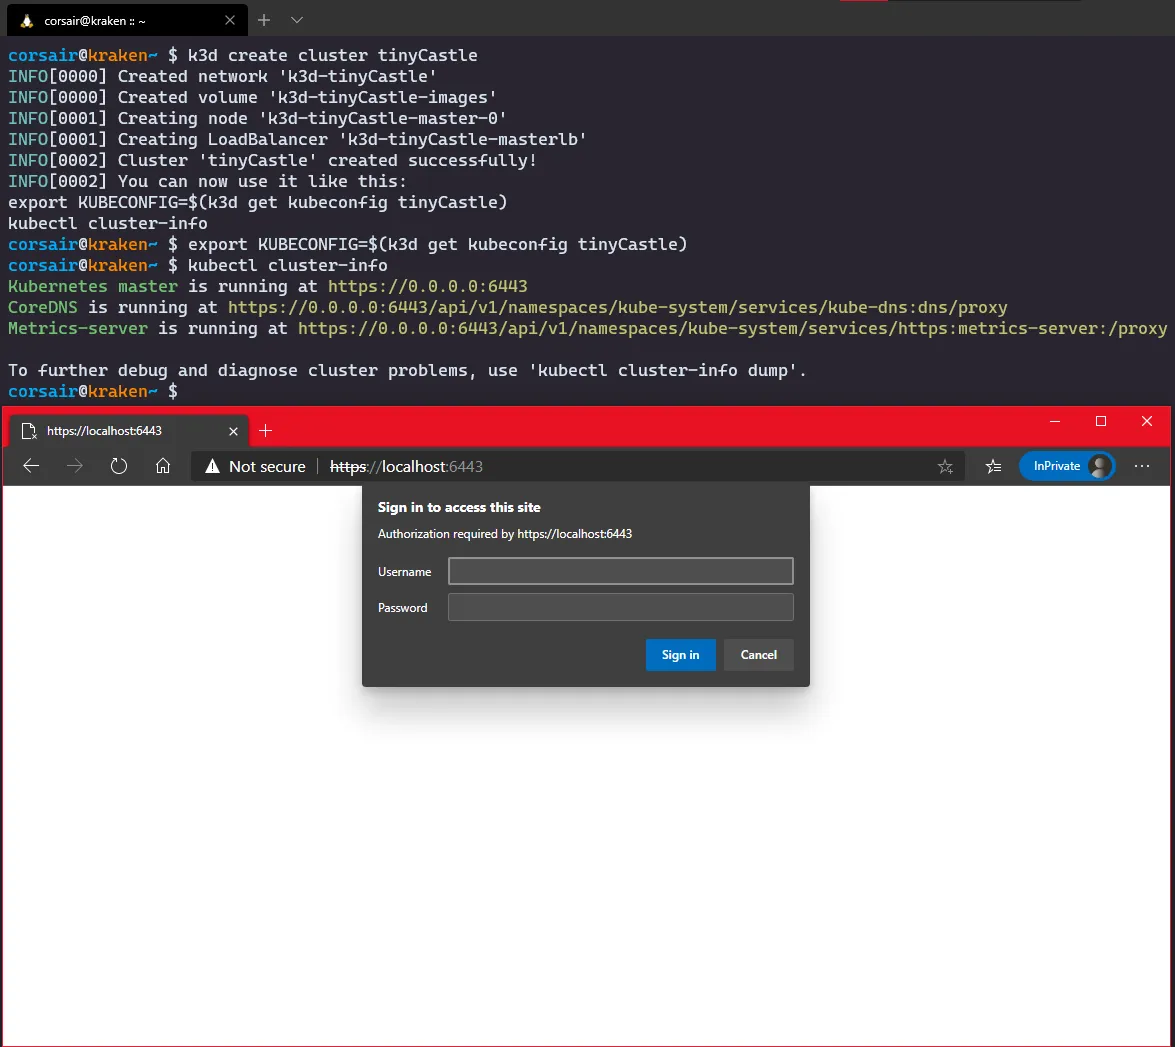
- Perfect, our cluster is reachable, so we can delete it
# Check the list of clusters createdk3d get cluster# Delete the clusterk3d delete cluster <cluster name># Check if the cluster has been correctly deletedk3d get clusterkubectl cluster-info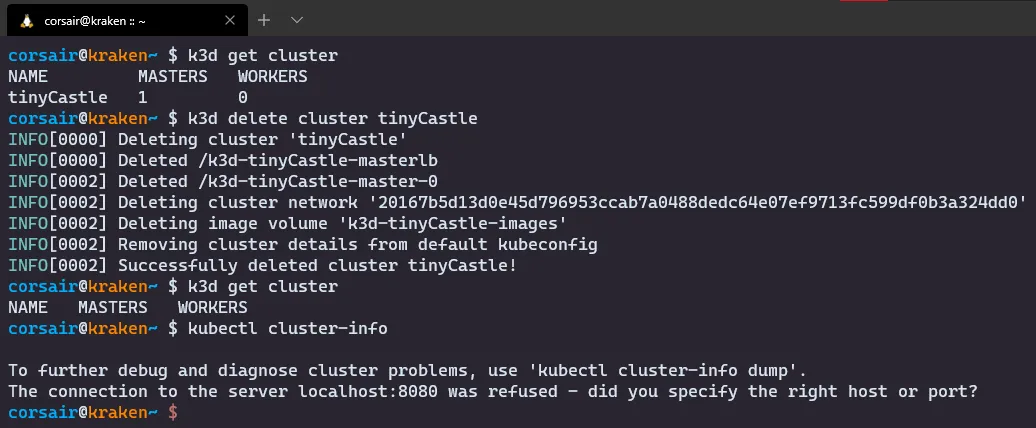
Congratulations! The first stage is now clear, let’s jump into the second stage.
Stage 2: let’s build a BIG castle
Our first cluster was created with a single master node, but in this game we want more. So let’s create a new cluster with three masters and three workers:
And before we start, I strongly recommend you to see the commands page for K3d. There might options that you would like to use or try.
Let’s build our big castle, and for fun, we will create it with the latest Kubernetes version supported in K3s (1.18.2 at the time of this writing) and we will open an extra port that will be used for the Ingress connections (see below LoadBalancer: Access from Windows with Ingress):
# Create the cluster with 2 masters and 3 workers with the latest K3s imagek3d create cluster <cluster name> --masters 3 --workers 3 --image rancher/k3s:v1.18.2-k3s1 --port <Ingress Port>:80@loadbalancer# Check if the cluster has been correctly createdk3d get cluster# Set the KUBECONFIG variableexport KUBECONFIG=$(k3d get kubeconfig <cluster name>)# Check if the cluster is runningkubectl cluster-info# List the nodes createdk3d get nodes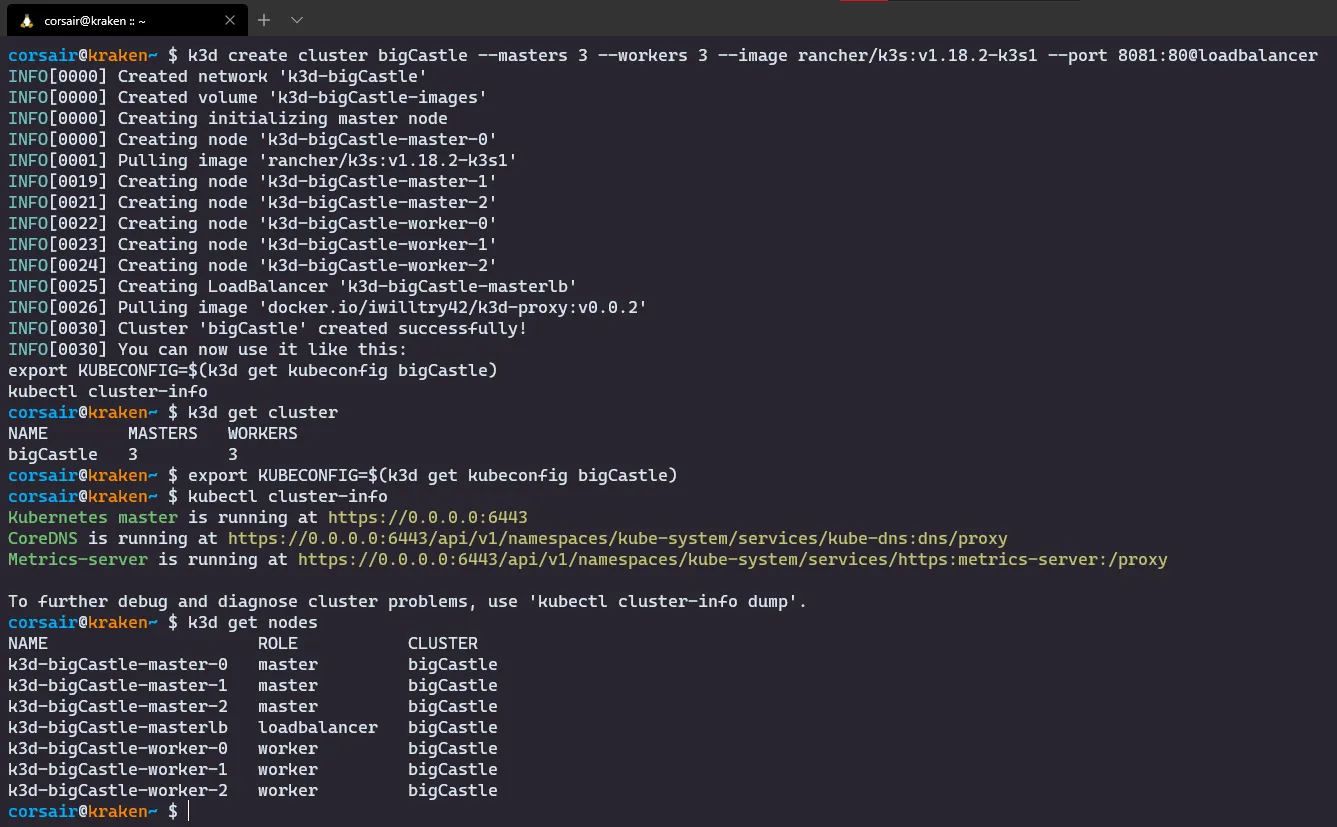
NOTE: We have now a cluster with three masters and three workers. However as we can see, there’s actually another node created at the same time. This is a Load Balancer that will be used as the single entry point to our nodes and more specifically the master nodes.
Congratulations! The second stage is now cleared and we can attack the third stage.
Stage 3: let’s build a watchtower
Ok, we have a big castle but quite empty for now. Let’s remediate to that and deploy our first application that will also help us to “see better” (read: web interface) what we have currently deployed.
As I promised you an arcade game, we will not deploy any yaml file, instead we will use a tool for deploying our first application: say hello to Arkade by Alex Ellis.
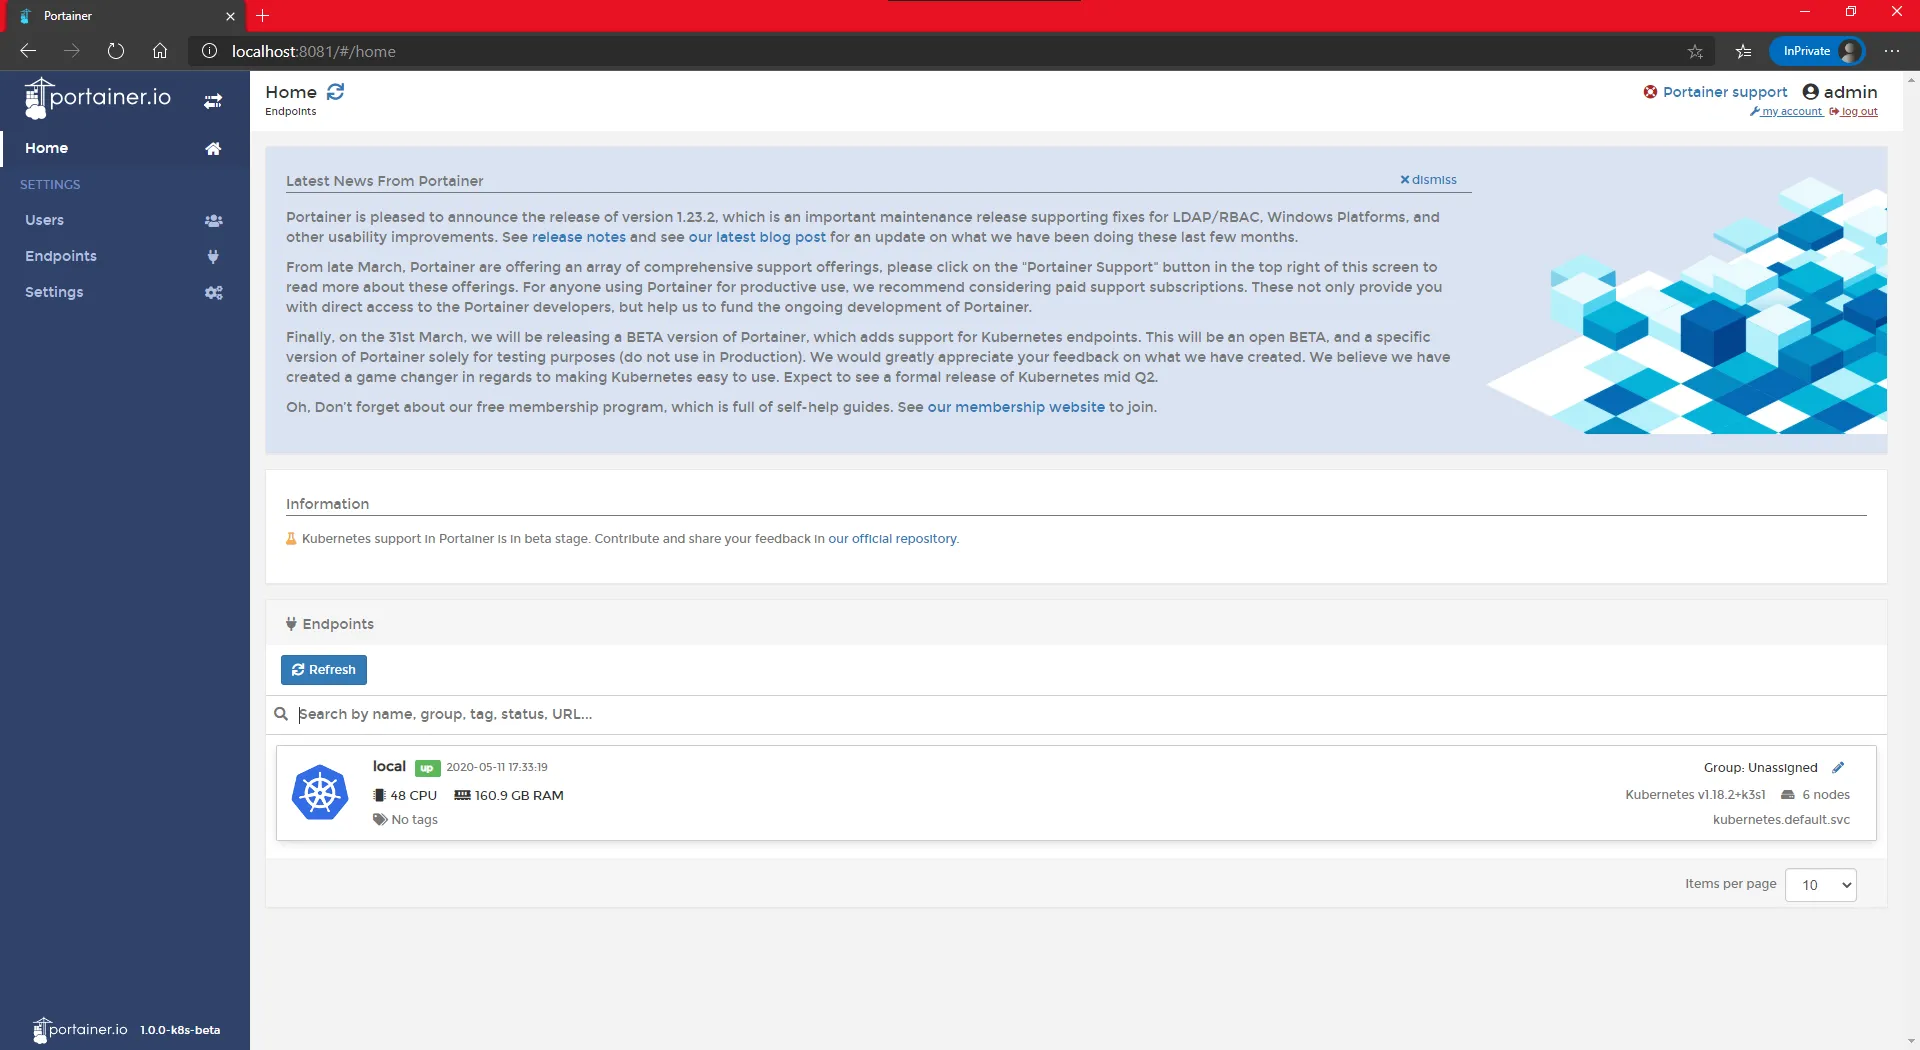
Also, the application that we will install is Portainer, a very convenient and modern dashboard for Docker and Kubernetes.
Let’s enhance our castle:
- Install Arkade
# Run the installation script > this will create an alias "ark" for "arkade"curl -sLS https://dl.get-arkade.dev | sudo sh# Check the options availableark --help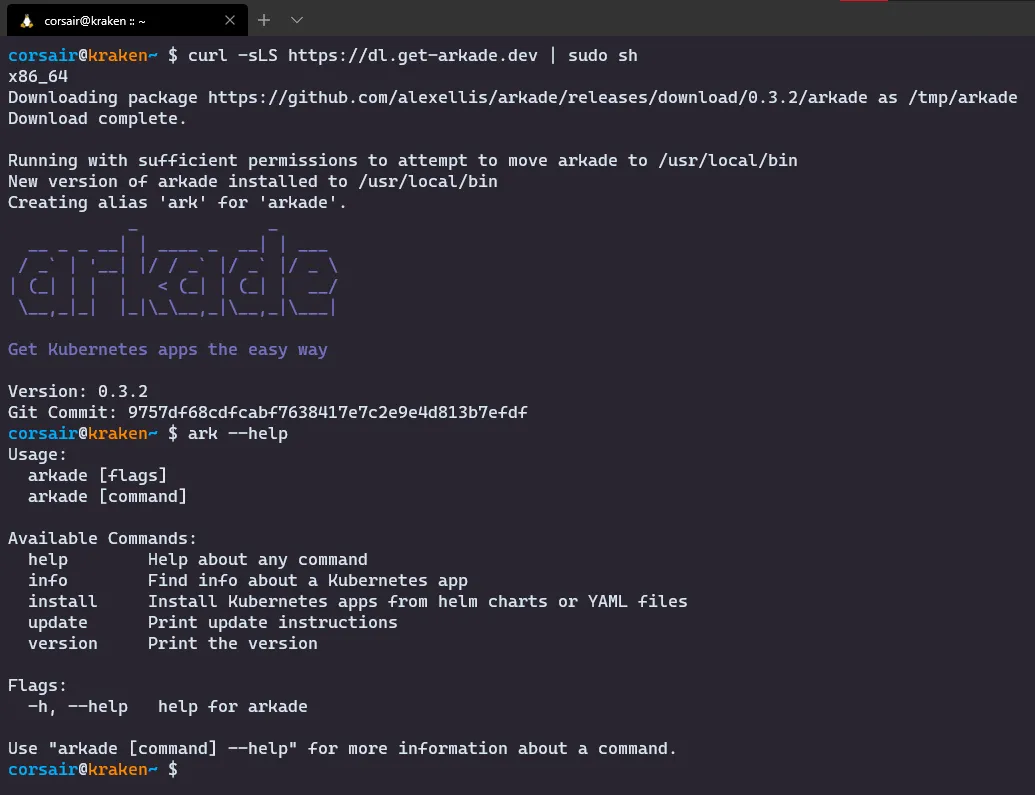
- List the applications that can be installed with Arkade
# The list of applications are under the install commandark install --help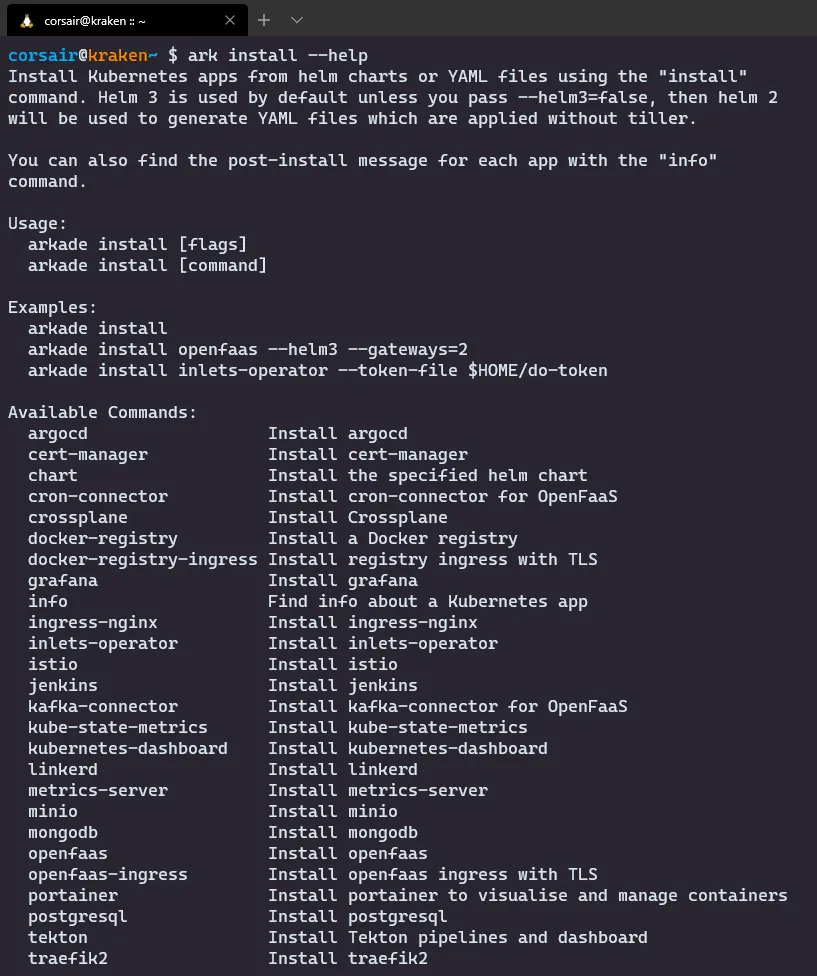
- Install Portainer
# Install Portainer with Arkadeark install portainer# Check if the components are all runningkubectl get all -n portainer# Expose the service on port 9000kubectl port-forward -n portainer svc/portainer 9000:9000 &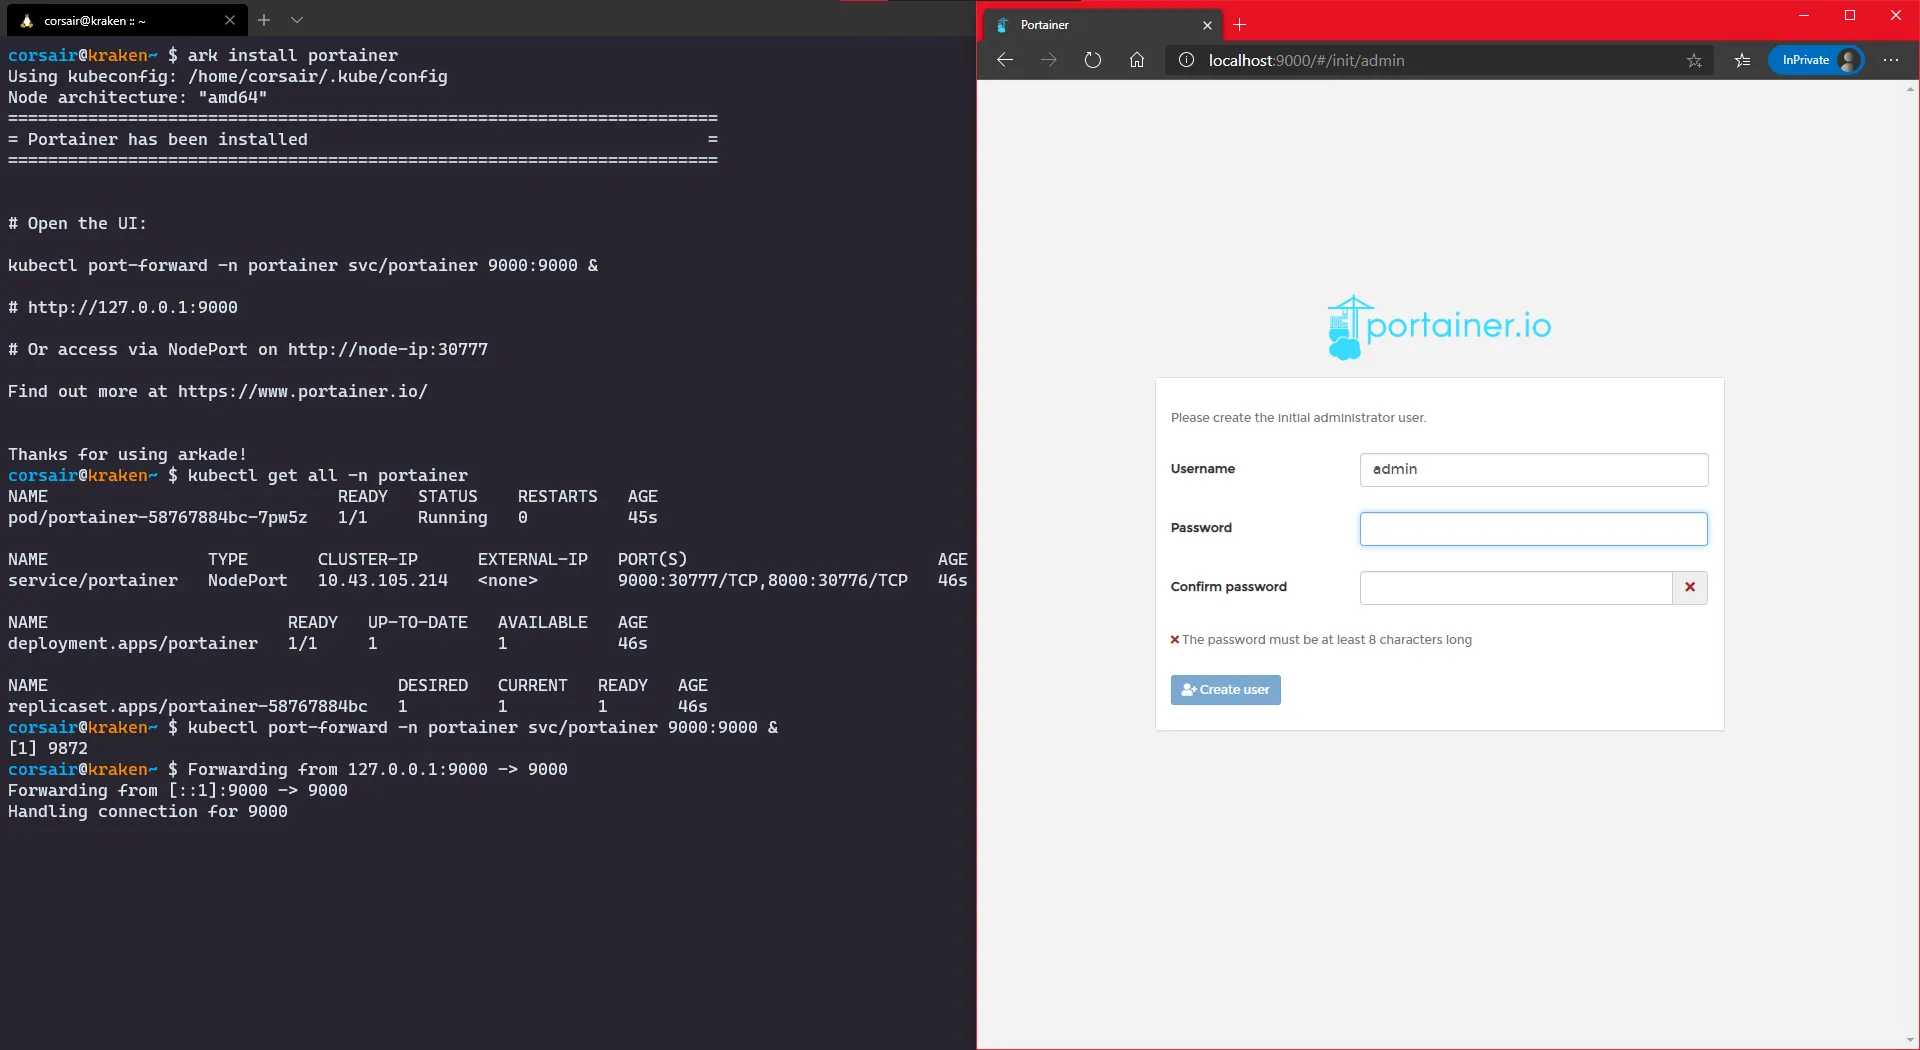
Stage 3 - Bonus stage: The many doors of the Watchtower
In order to access our Watchtower (read: Portainer service), we had to expose the port “again”. This works great for this Kubernetes inside Docker inside WSL2 and accessing it from the Windows browser. But is not really optimal, specially when K3d comes with a pre-installed loadbalancer.
So here are three other “doors” that require a bit more work, but hey, bonus stages are meant to be as challenging as the reward we get.
NodePort: Access from WSL2
If we want to access via NodePort “Linux style”, then the easiest way is to start a Xwindow application (i.e. https://x410.dev/) on Windows. Then we install a browser on WSL2 (i.e. Firefox) and we access the service via NodePort and the (already) exposed port:
# Check the Portainer service and the port it exposedkubectl get service -n portainer# Check the Portainers pod and on which node it's runningkubectl get pod -n portainer -o wide# Check the nodes and their respective IPskubectl get node -o wide# Open your WSL2 browser and enter the url http://<node IP>:<service port>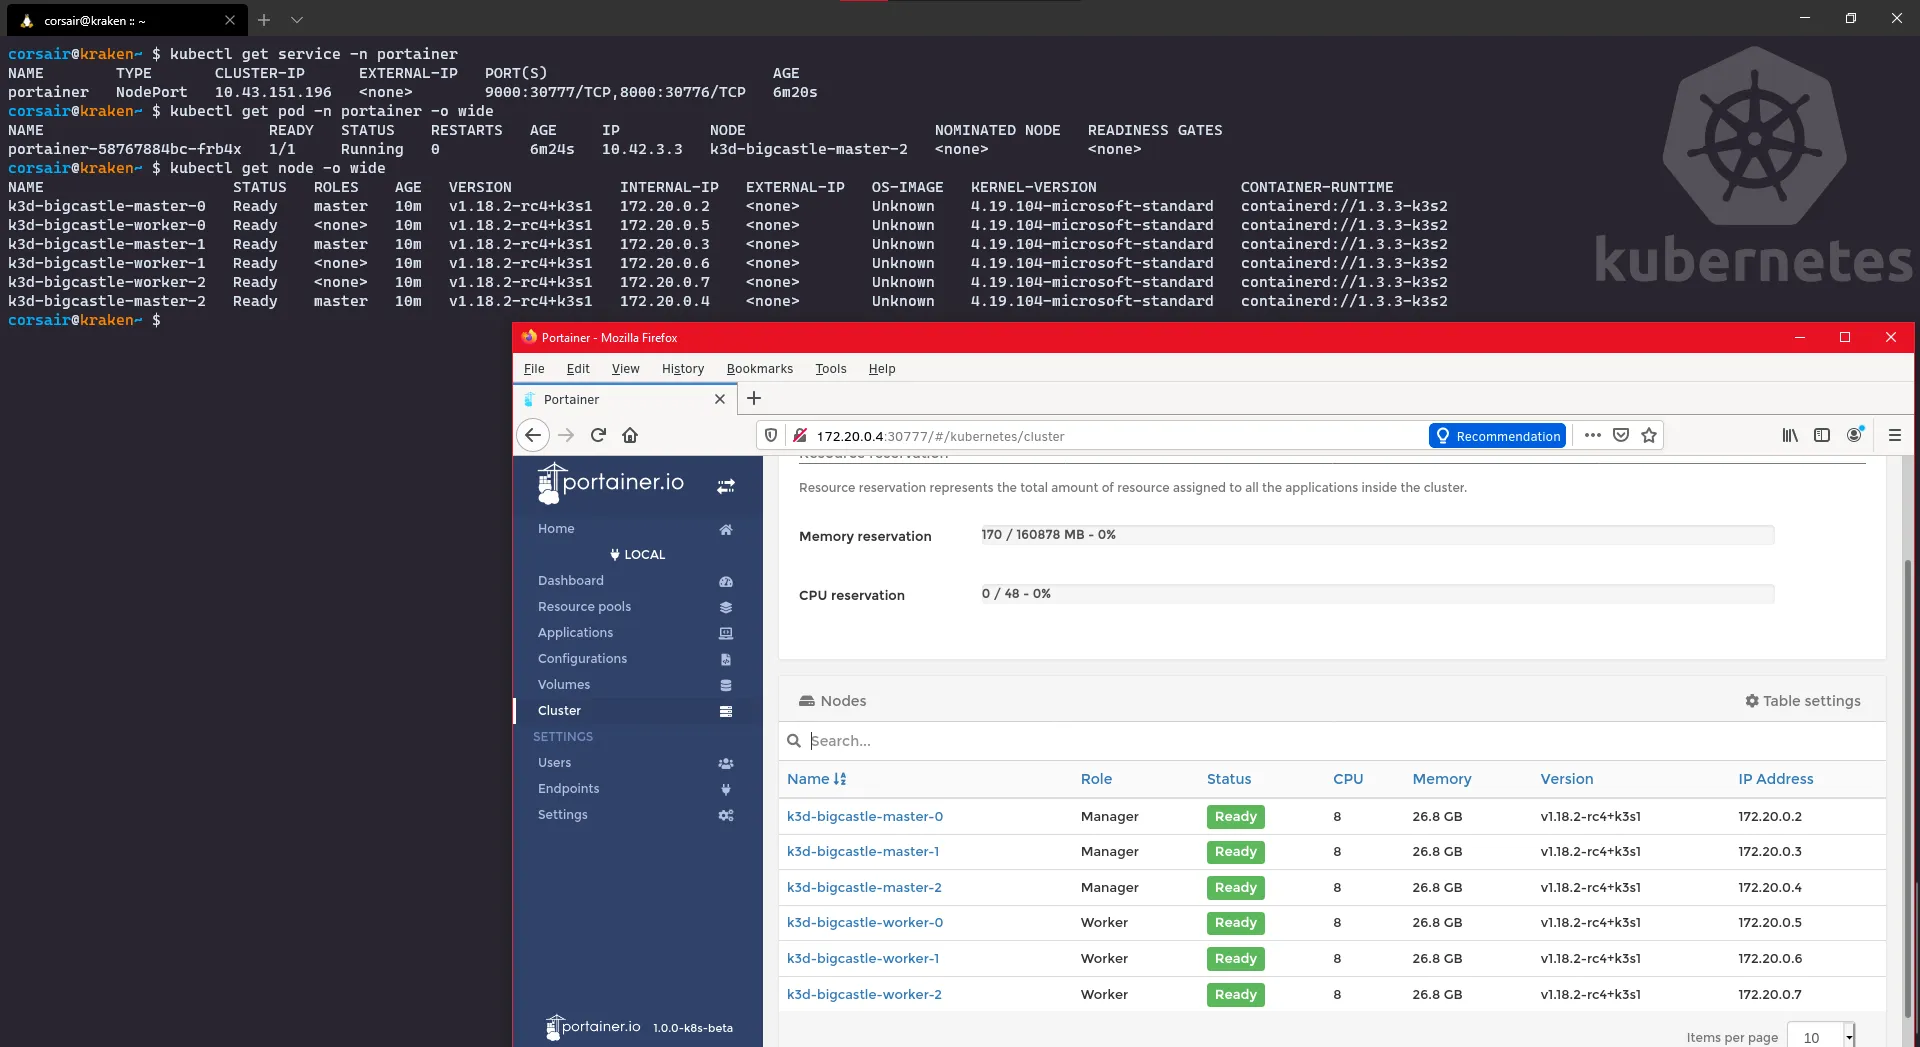
Cool, but actually there’s something even cooler: remember that we have a loadbalancer installed by default? Well let’s take advantage of it and instead of searching for the node port, we can access it through the Master IP:
# Check all the services to see which IP the loadbalancer is usingkubectl get service --all-namespaces# Open your WSL2 browser and enter the url http://<master IP>:<service port>
NodePort: Access from Windows
Let’s say that the previous access was nice, but you want to keep a WSL2 distro “clean” and prefer to use the Windows browser.
It is also possible, but we will need to create a route so Windows knows “where” to find your node:
- In WSL2, we need to retrieve the following information:
# Check all the services to see which IP the loadbalancer is usingkubectl get service --all-namespaces# Check the routing table and spot the route subnet and its network maskip route show# Check your current WSL2 IPip addr show eth0- In Powershell, add the new route
# Check that the IP is currently not reachableping <master IP> -n 1# Add the routeroute add <route subnet>/<network mask> <WSL2 IP># Check if the IP is now reachableping <master IP> -n 1# Open your Windows browser and enter the url http://<master IP>:<service port>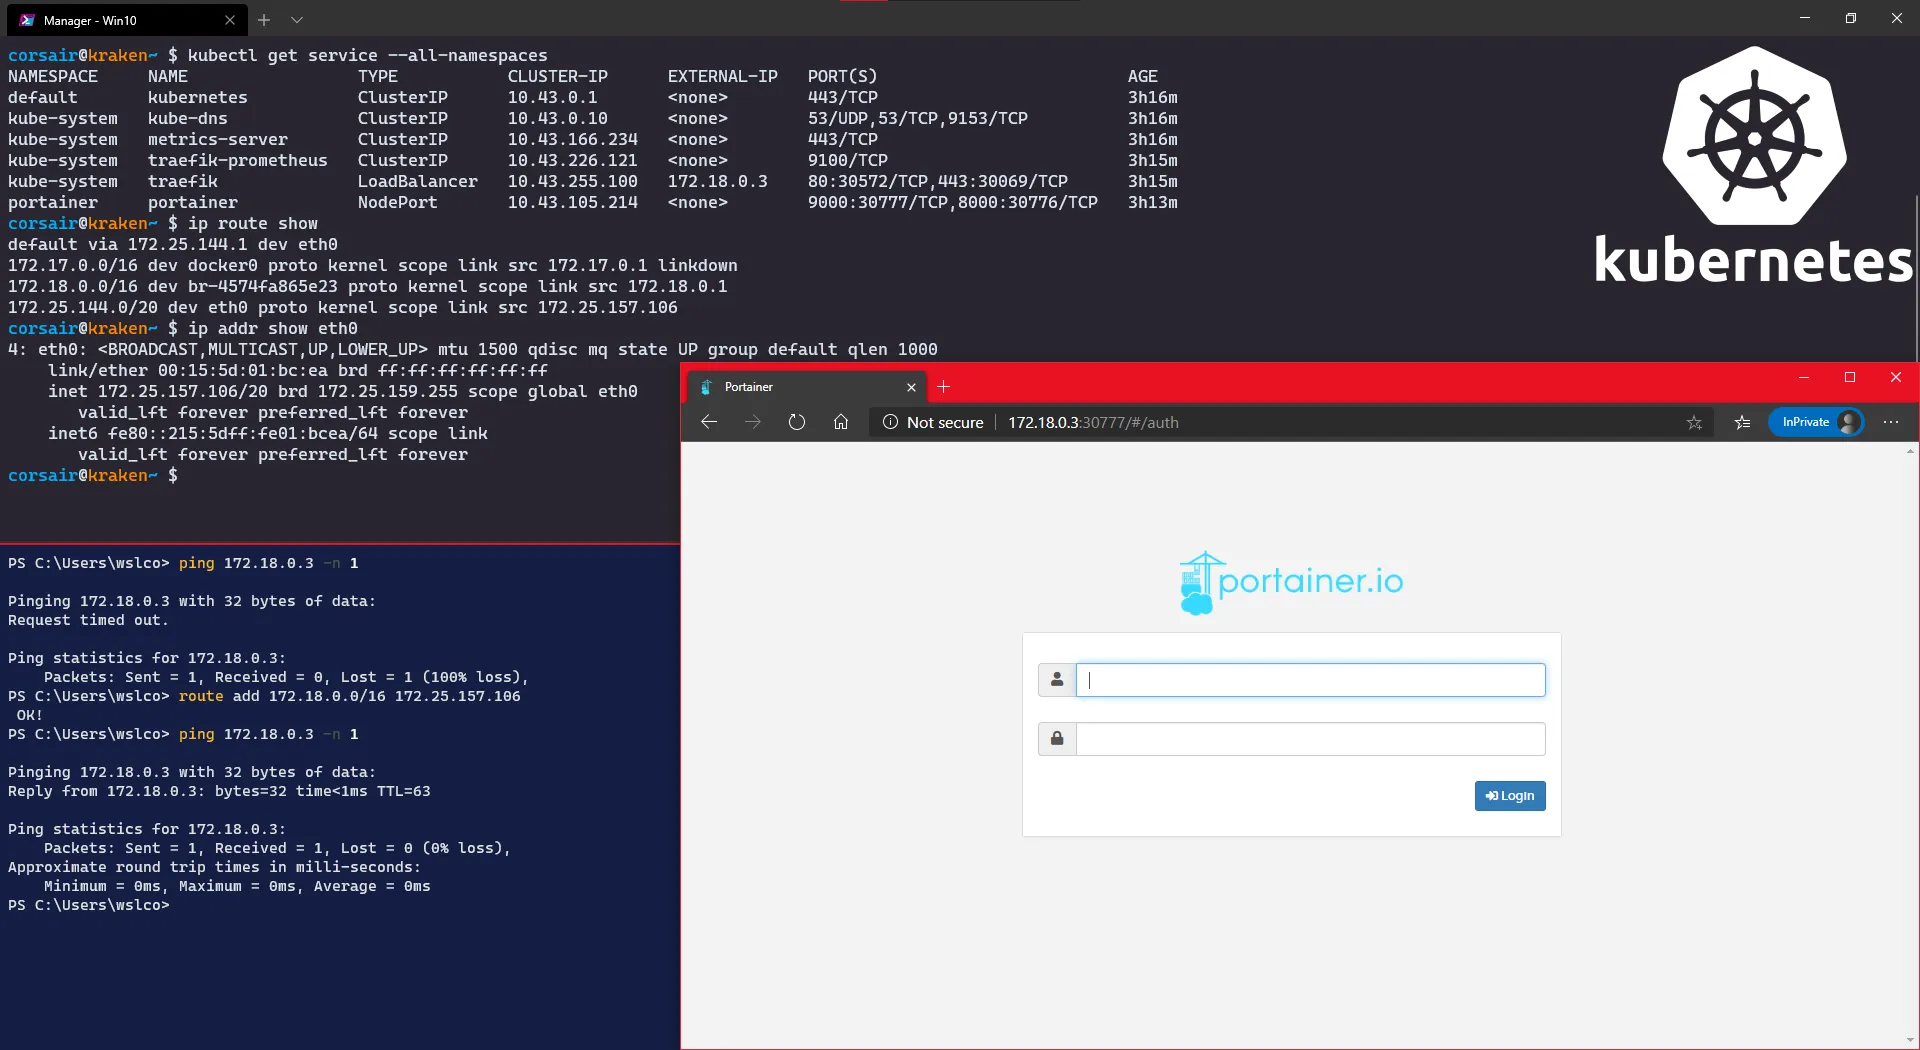
NodePort: Access from Windows with Inlets
Let’s say that the previous accesses were nice, but you want to keep a WSL2 distro “clean”, prefer to use the Windows browser while not creating any route.
Again, there’s a solution for you created by Alex Ellis (yes yes, the same as Arkade): I introduce you to Inlets.
We will use the free version here, but if it gives you any good ideas and you would like to use it other contexts other than Web, please have a look at the PRO version
Ok, will all that said, let’s install Inlets and create our tunnel:
- Install Inlets and check the service
# Run the installation scriptcurl -sLS https://get.inlets.dev | sudo sh# # Check all the services to see which IP the loadbalancer is usingkubectl get service --all-namespaces- Create a token and start the Inlets server > I did this in a new shell (read: terminal pane)
# Create a tokenexport token=$(head -c 16 /dev/urandom | shasum | cut -d" " -f1)# Save the token into a fileecho $token > inlets-token# Start the Inlets server > this will open the port in the WSL2 distro (read: localhost)inlets server --port=<Inlets server port> --token="$token"- Create the tunnel with Inlets client
# Create the tunnel where remote is your Server Port and upstream your kubernetes serviceinlets client --remote=127.0.0.1:<Inlets server port> --upstream=<master IP>:<service port> --token-from=inlets-token# Open your Windows browser and enter the url http://localhost:<Inlets server port>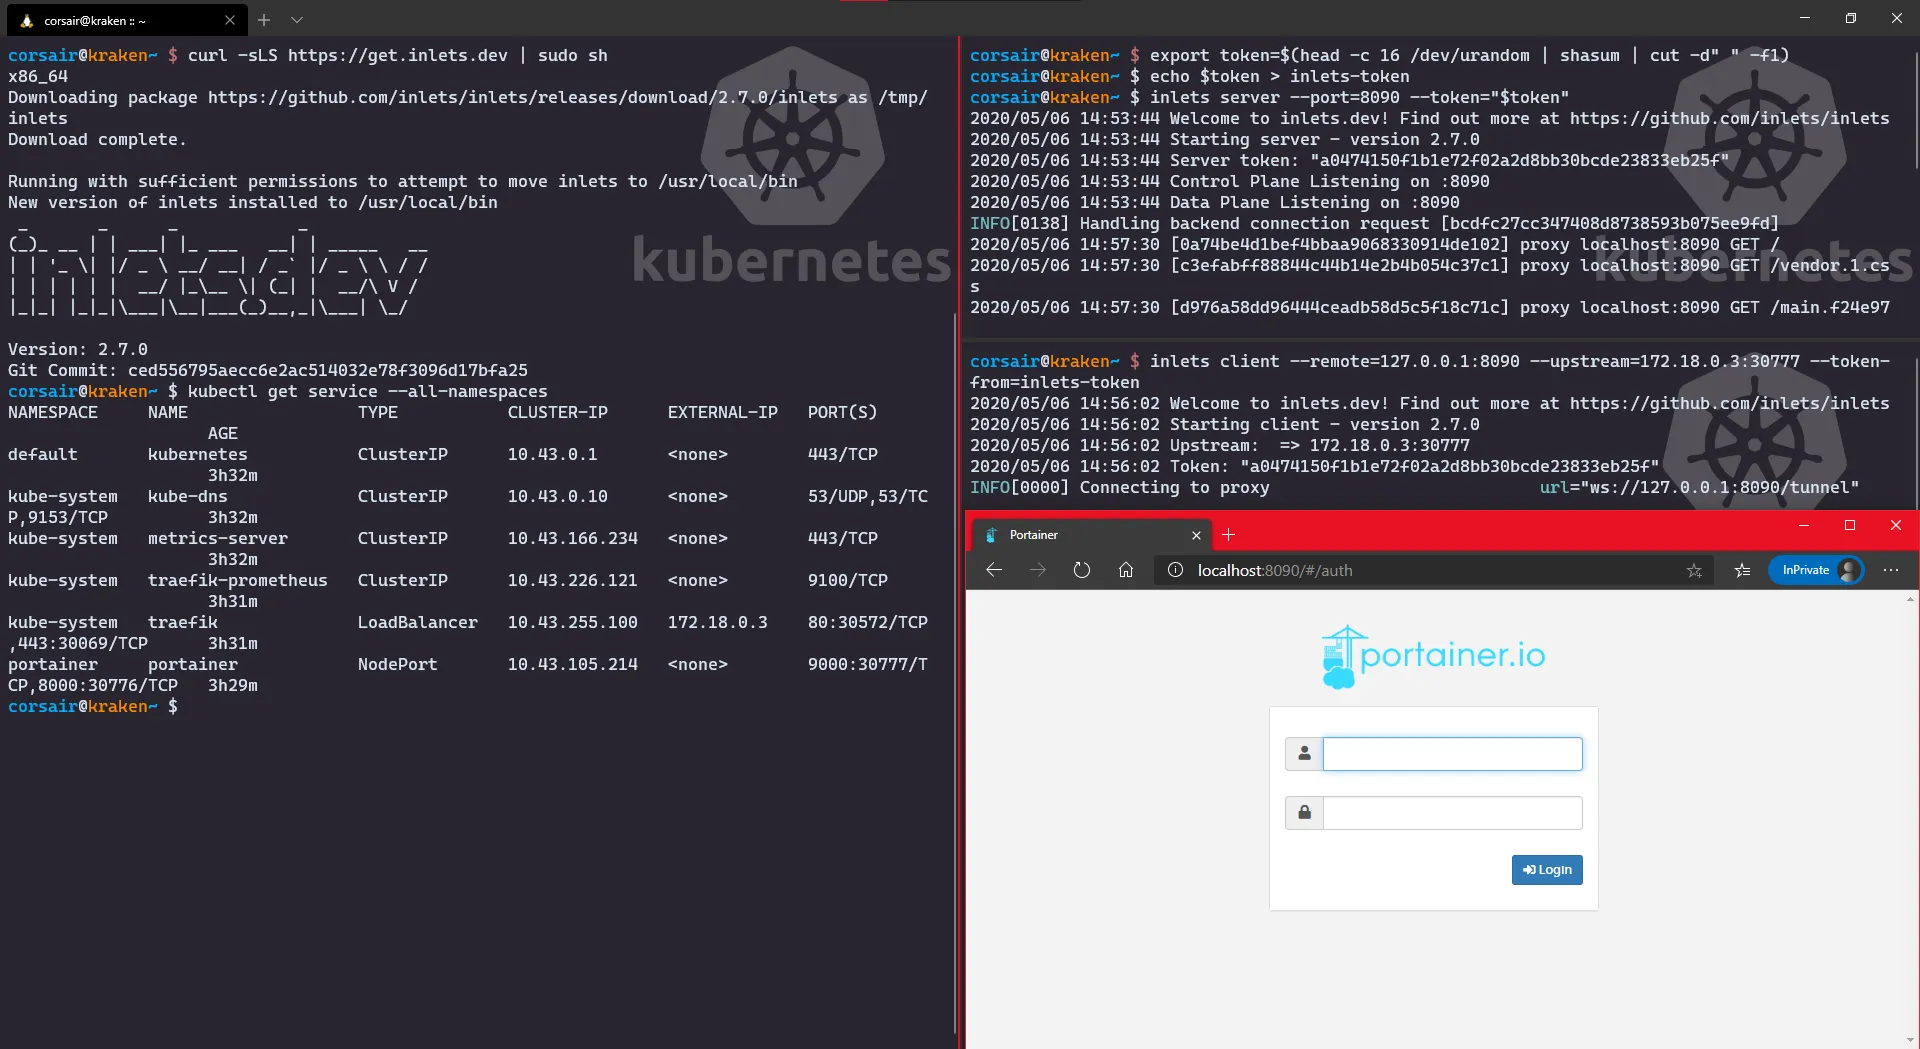
LoadBalancer: Access from Windows with Ingress
Let’s say that the previous accesses were nice, but you want to keep a WSL2 distro “clean”, prefer to use the Windows browser while not creating any route and you don’t want/can’t use an extra tool.
There is of course a solution for you, however this one we will need to go into YAML land. Of course, the gain is quite big as we will have a “pure Kubernetes” solution thanks to several parts K3d integrates by default (read: LoadBalancing and Traefik ingress).
Ok, let’s start the CO-OP stage:
# Check the Portainer service and the port it exposedkubectl get service -n portainer# Create a new Ingress rule for Portainervi portainer-ingress.yamlapiVersion: extensions/v1beta1kind: Ingressmetadata: namespace: portainer name: portainer-ingressspec: rules: - http: paths: - path: / backend: serviceName: portainer servicePort: 9000# Apply the configurationkubectl apply -f portainer-ingress.yaml# Check if the configuration has been created correctlykubectl get ingress -n portainerkubectl describe ingress -n portainer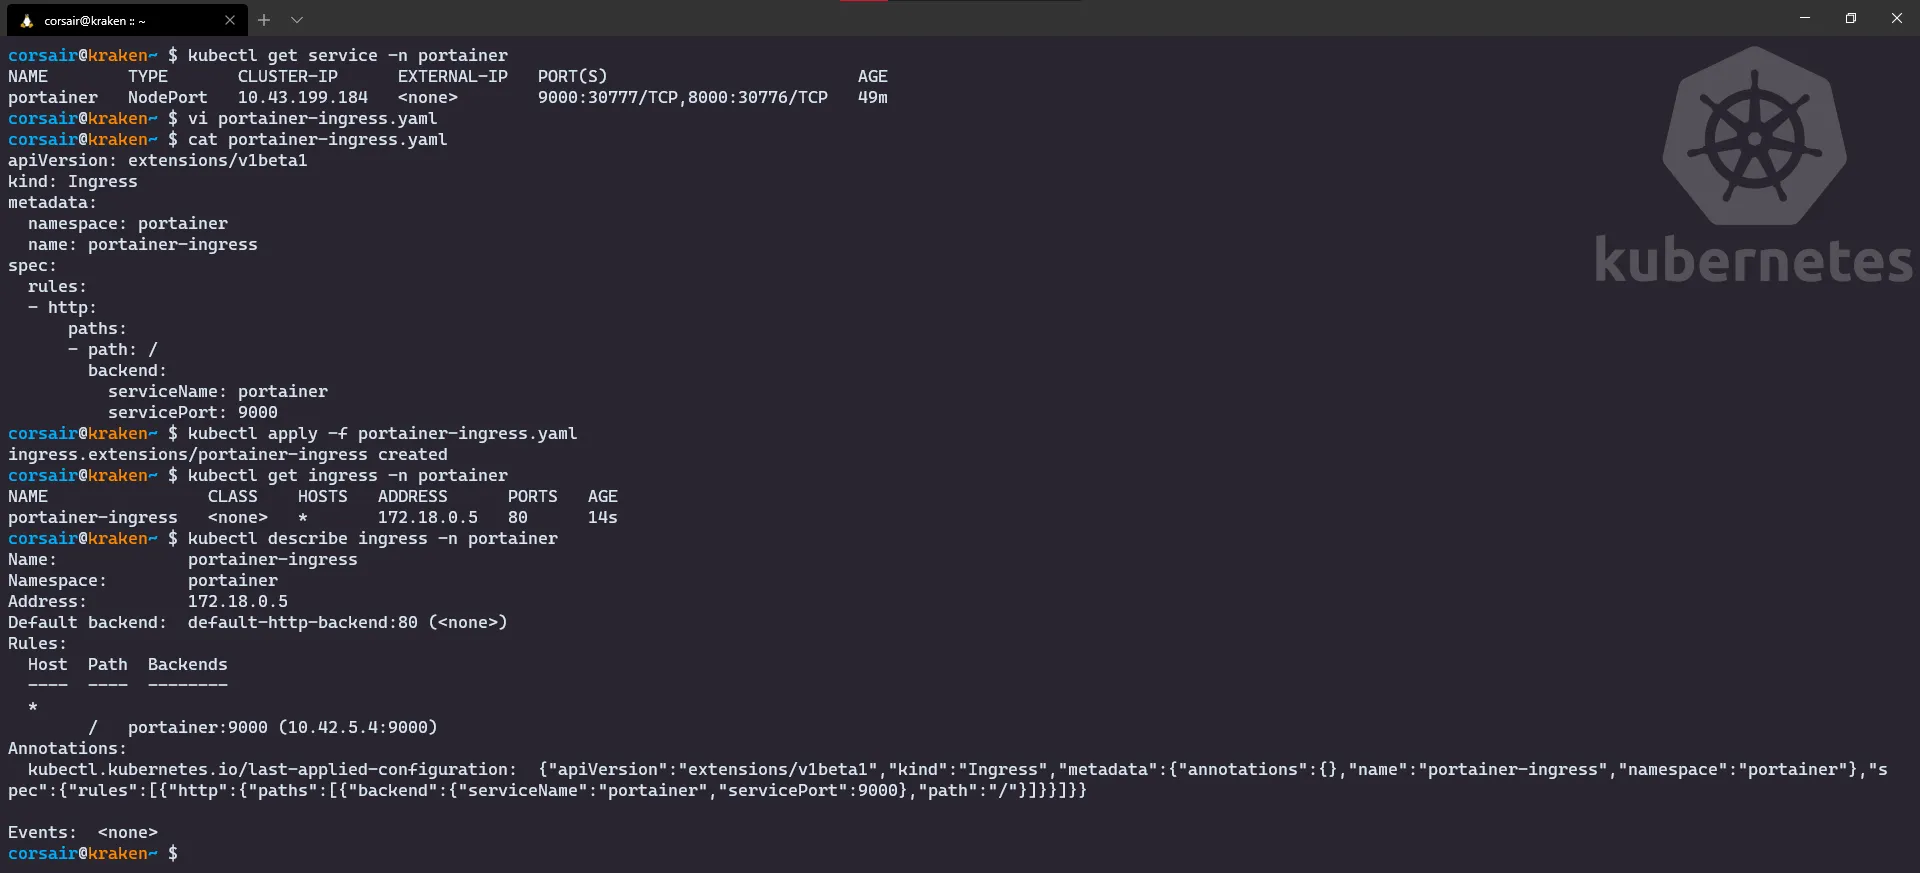
Once created, open your Windows browser and enter the url http://
NOTE: the Ingress port has been set during the creation of the cluster
k3d create cluster <cluster name> --masters 3 --workers 3 --image rancher/k3s:v1.18.2-k3s1 --port <Ingress Port>:80@loadbalancer
Congratulations! The third stage is now cleared and we can attack the final stage: the Castle defense.
Stage 4: let’s defend the BIG castle
Ok, it’s an arcade game and we meet the the final boss, but he has a special attack: remove one master.
How will our castle defense reacts? let’s find out together and witness the power of High Availability live. And for this test, I will be using the Windows browser and the Ingress connection:
- First check that all the nodes are running fine
# Check the nodes from Kubernetes point of viewkubectl get nodes# Check the nodes from Docker point of viewdocker ps# Open your Windows browser and enter the url http://<master IP>:<Ingress port>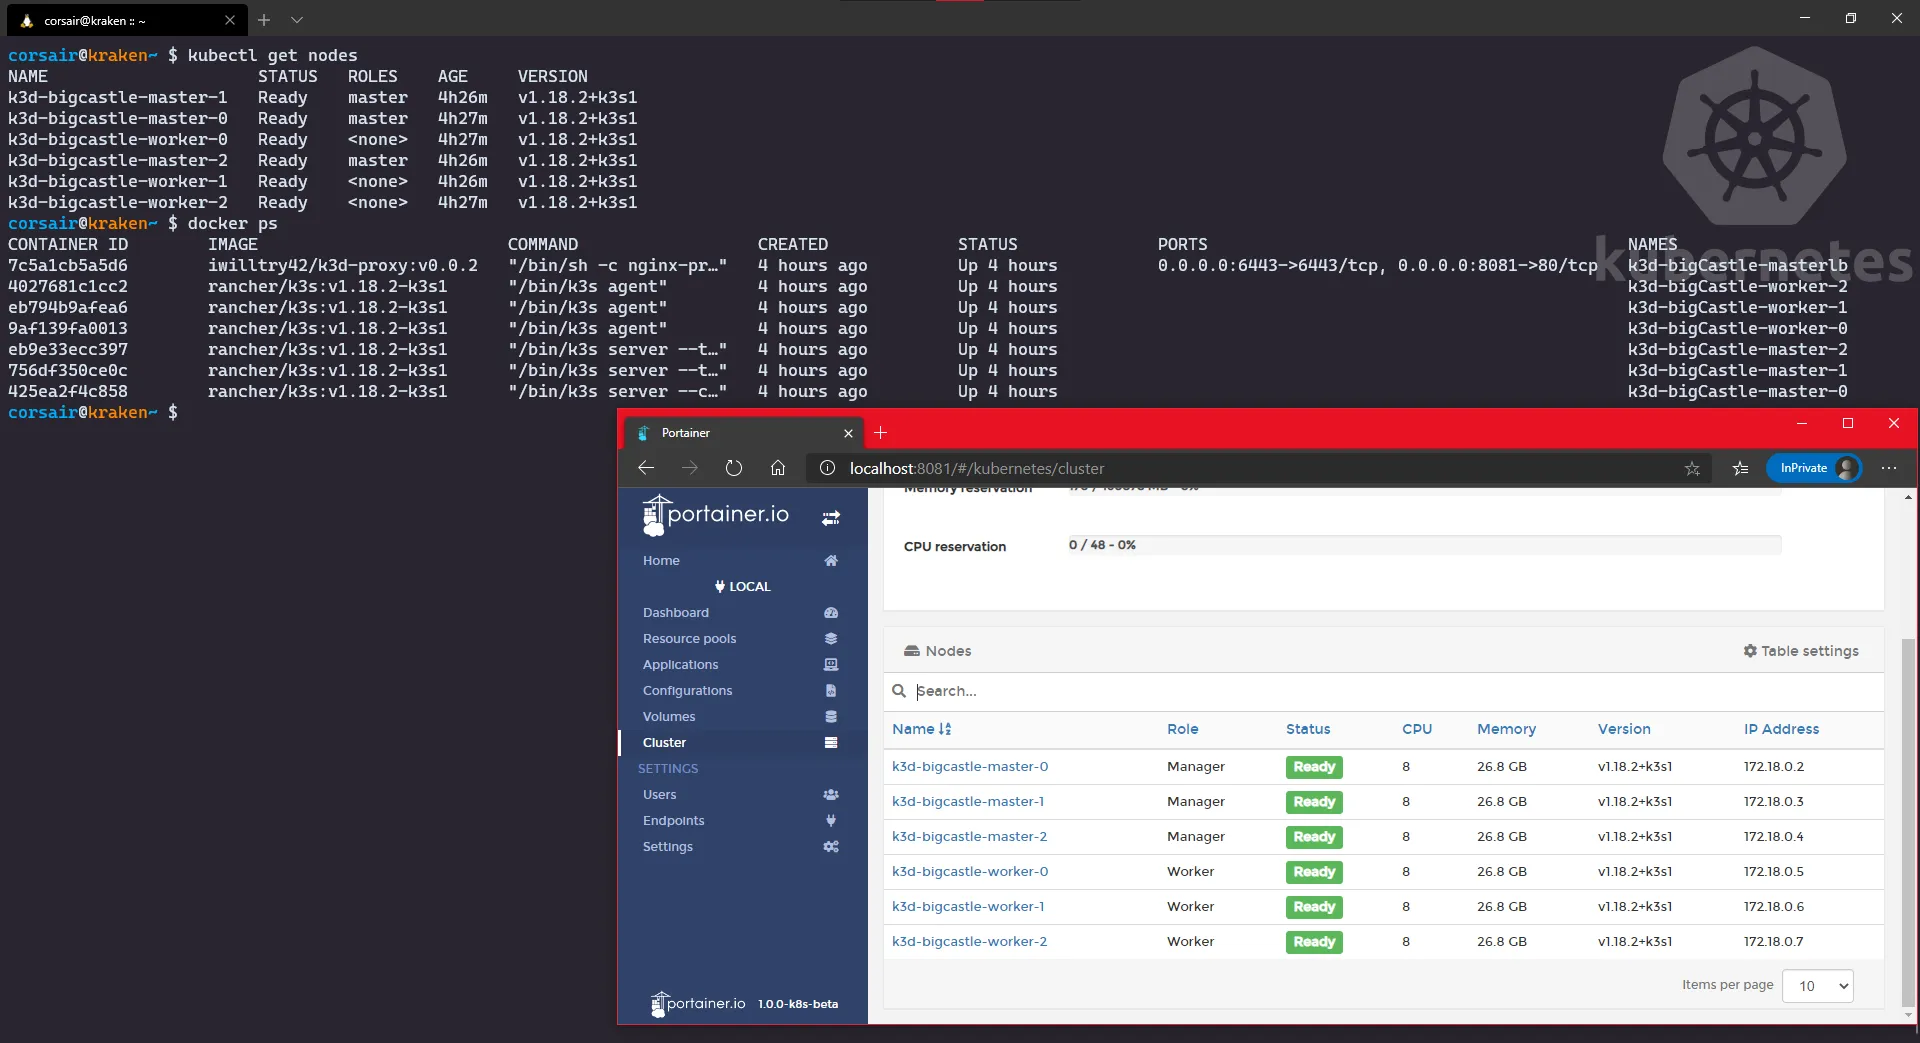
- Stop the node
master0and check the status again > I did it over 1 minute to get to the final screen
# Stop the node with Dockerdocker stop <master0 container name># Check the nodes from Kubernetes point of viewkubectl get nodes# Check the nodes from Docker point of viewdocker ps# Open your Windows browser and enter the url http://<master IP>:<Ingress port>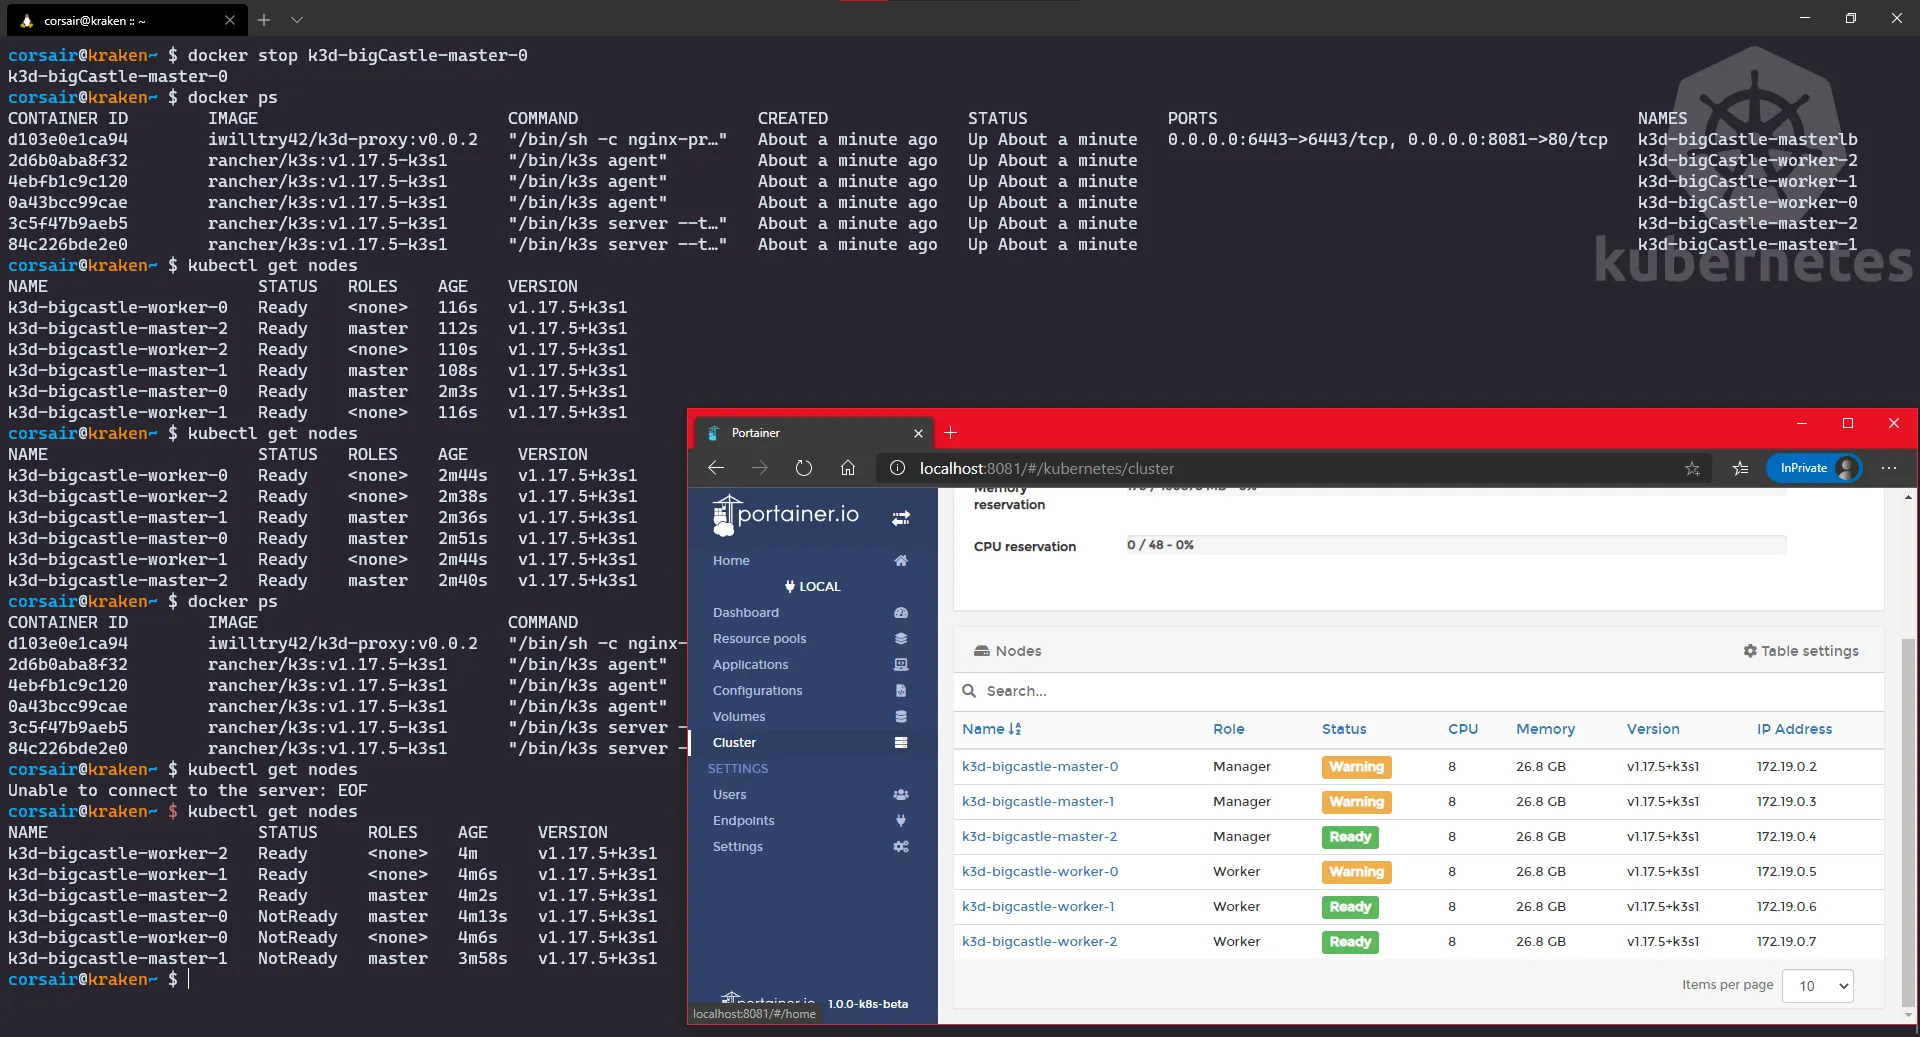
As we can see, the cluster was heavily it by losing the master0, but again it’s the most critical one. Still, even if it took down with him a second master and even a worker, thanks to the remaining master and two workers, the cluster is still operating in (very) degraded mode.
Finally, let’s bring back master0 and witness the happiness with an all green dashboard:
# Start the node with Dockerdocker start <master0 container name># Check the nodes from Kubernetes point of viewkubectl get nodes# Check the nodes from Docker point of viewdocker ps# Open your Windows browser and enter the url http://<master IP>:<Ingress port>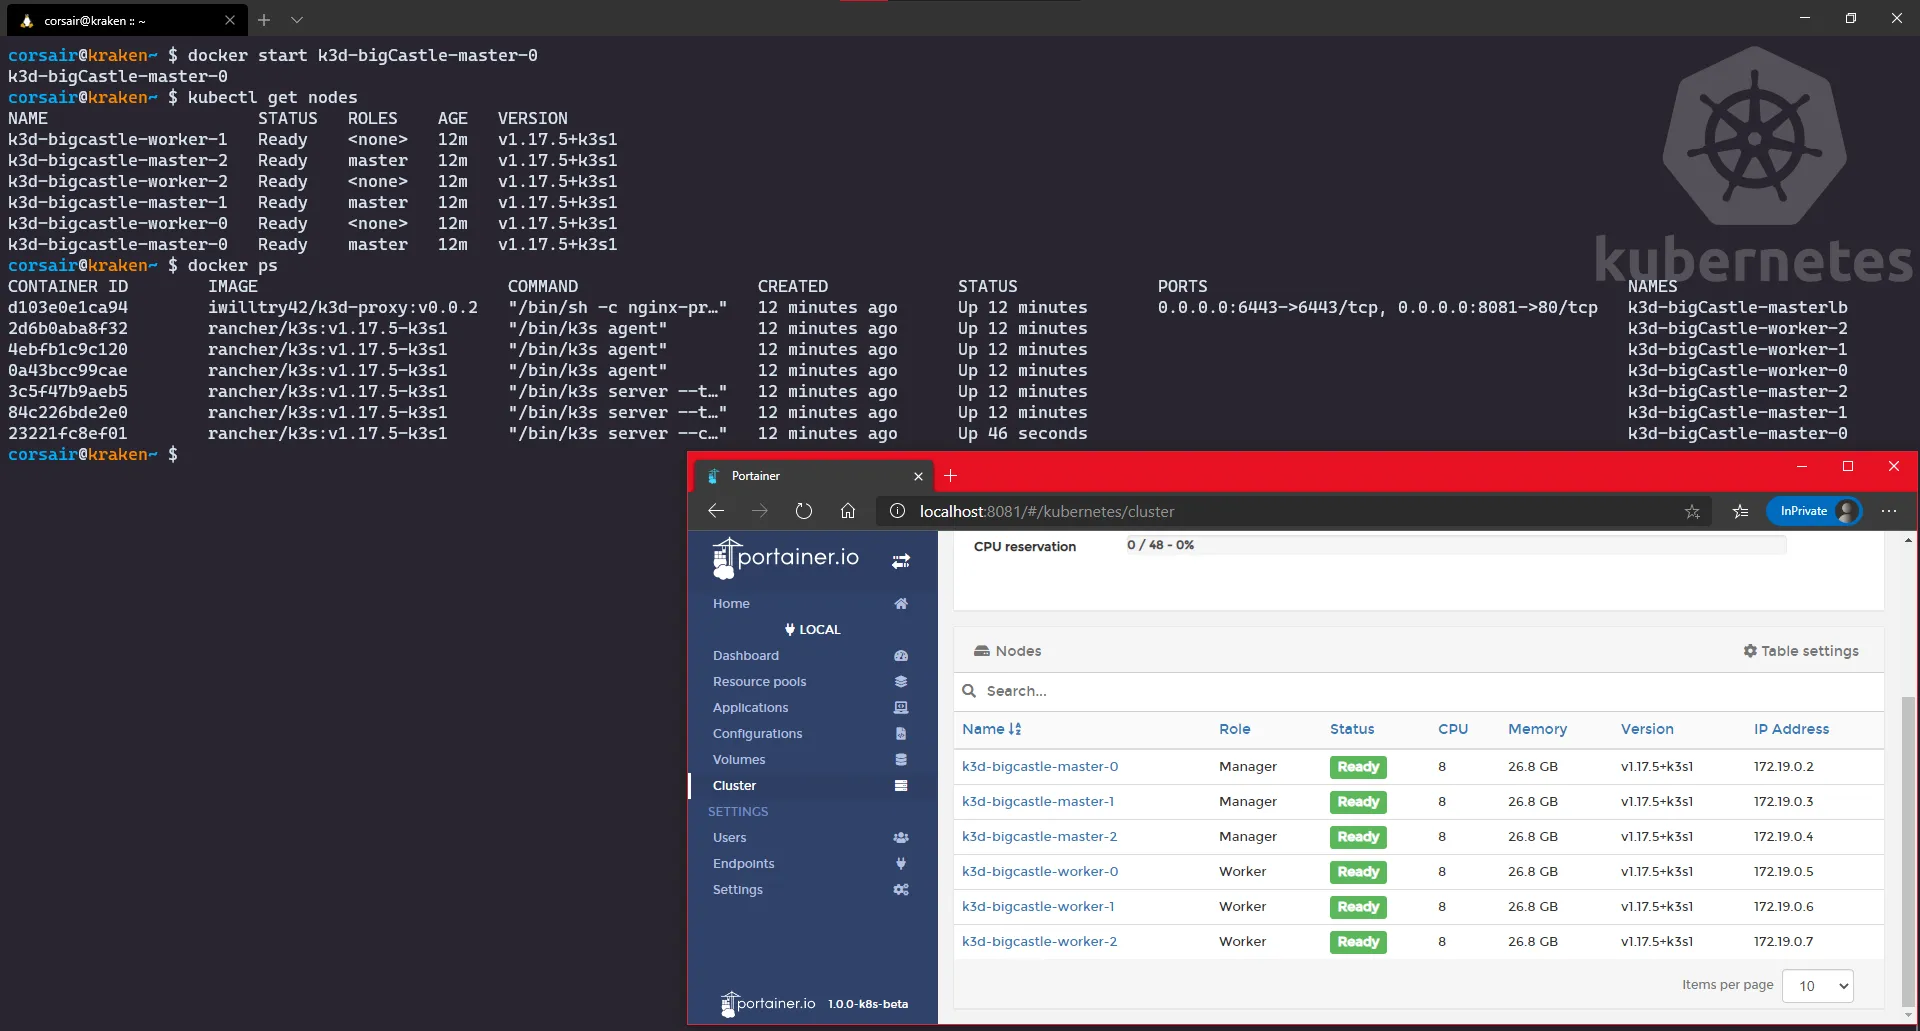
Conclusion
First of all, I really hope you had fun reading this post, and even more trying/testing the new K3d v3.
The “multi-master” feature is something that we might start seeing appearing and it will serve two purposes (and this only my point of view):
- “Small/Local” Kubernetes distros will start to be used in bigger workloads and/or they will be deployed in PROD as clusters for specialized/independent applications.
- When learning Kubernetes with a local cluster, it’s very often a single node or a “one master for X workers”, so the High Availability aspect is not learnt/known. This feature will definitively fill a gap in the learning.
Finally, as usual, I welcome any feedback on twitter (@nunixtech).
>>> Nunix out <<<